Category Archives: Linux

some linux topics, hacks, fixes, bugs and so on — everything what seems to be important to me.

Apache – force autocomplete=off for password fields

If 3rd party software is installed it is quite likely that the autocomplete attribute for password fields is not set to off. Editing such settings directly in the sourceode is possible most of the time, but it’s not the nicest way and you also run into the problem that everything could be gone again after an update of the software.

A nice workaround is to use the substitute module to accomplish that.

[pastacode lang=”markup” manual=”%3CLocation%20%22%2F%22%3E%0A%20%20%20%20AddOutputFilterByType%20SUBSTITUTE%20text%2Fhtml%0A%20%20%20%20Substitute%20%22s%7C%3Cinput%20type%3Dpassword%7C%3Cinput%20type%3Dpassword%20autocomplete%3Doff%7Ci%22%0A%3C%2FLocation%3E” message=”disable autocomplete for password fields” highlight=”” provider=”manual”/]

Create you onw 4to6-tunnel / Access IPv6 service from IPv4 address

With my recent ISP-change for my internet at home there where quite a lot of changes. One of that changes was, that UPC – my current provider – uses DualStack Lite.
For me it’s the first ISP that really provides IPv6. So that’s pretty cool and I finally had the chance (was forced) into digging deeper into IPv6.

In general everything is working quite well but, as it’s dual stack lite my router doesn’t provide an option to do some portforwarding to one of my hosts inside my local network. At least not for IPv4 connections. So I have no chance to access one of my devices via my public IPv4 address what becomes a problem when I want to connect to my home network via VPN from an IPv4 only network.

I couldn’t find any suitable 4to6 tunnel broker that lets me access my IPv6-devices through an IPv4 address, but luckily I have a VPS that runs on real dualstack and therefor has an IPv4 and IPv6 address.

So to access my IPV6 VPN server in my private network from an IPv4 only network I created an SSH-tunnel from my VPN-server (that runs on a Raspberry PI) to my VPS and forwarded the OpenVPN port.

To do that the VPS’ sshd-configuration needs to be adapted to expose forwarded ports to it’s public IP-address(es). For that the following setting needs to be added to/ changed in the sshd_config:

[pastacode lang=”bash” manual=”GatewayPorts%20yes” message=”” highlight=”” provider=”manual”/]


After that I created the following script on my VPN-Raspberry:

[pastacode lang=”bash” manual=”%23!%2Fbin%2Fbash%0A%0AvarConnectionString%3D%22-nNT%20-R%201194%3Alocalhost%3A1194%20%3Cusername%3E%40%3Cservername%3E%20-p%20%3Cport%3E%22%0A%0Aif%20%5B%5B%20%24(ps%20aux%20%7C%20grep%20-v%20%22grep%22%20%7C%20grep%20%22%24(echo%20%24varConnectionString%20%7C%20sed%20’s%2F%5E-%2F%5C%5C-%2Fg’)%22)%20%5D%5D%3B%20then%0A%0Aecho%20%22Found%20active%20connection%22%0A%0Aelse%0A%0Aecho%20%22No%20active%20connection%20found%22%0Assh%20%24(echo%20%24varConnectionString)%20%26%0Afi” message=”create SSH-tunnel” highlight=”” provider=”manual”/]

That script is added to be exectuted every half hour as a cronjob. So if the connection (for whatever reason) gets diconnected it will automatically reconnect to the VPS and forward the port again.

 

ORACLE – Convert datetime to epoch / unixtimestamp

It seems Oracle DB doesn’t provide a function to create a unix timestamp from an internal datetime. I have to admit – I’m kinda disappointed about that, but OK – its Oracle …

So, how can we get a timestamp from Oracle. I have googled quite a time, but non of the solutions google offered me worked, so i it’s time to think about it by myself and ended up with the following solution:

[pastacode lang=”sql” manual=”select%20(extract(day%20from%20(EVENT_TIME%20%20-%20to_date(’01-JAN-1970’%2C’DD-MON-YYYY’)))*86400%2Bextract(hour%20from%20EVENT_TIME)*3600%2Bextract(minute%20from%20EVENT_TIME)*60%2Bextract(second%20from%20EVENT_TIME))%20as%20EPOCH%20from%20SOMETABLE%20order%20by%20event_time%20DESC%3B%0A” message=”” highlight=”” provider=”manual”/]

At first I subtract the start of the epoch from my current timestamp. this will provide me the days since 1970-01-01. Afterwards I extract hours, minutes and seconds from the timestamp and with all those data it’s possible to calc the timestamp of the specific datetime.

Zabbix – Clear hosts from untemplated items

Sometimes you run into the problem, that you have a host which had a template attached but somebody wanted to replace the template or something like that and unfortunately hit just “Unlink” instead of “Unlink and Clear” and all the items are still in the host.

If you have only one host it’s normaly no problem to delete all items per hand, but if you have multiple of those hosts it’s quite some work do remove the old items.

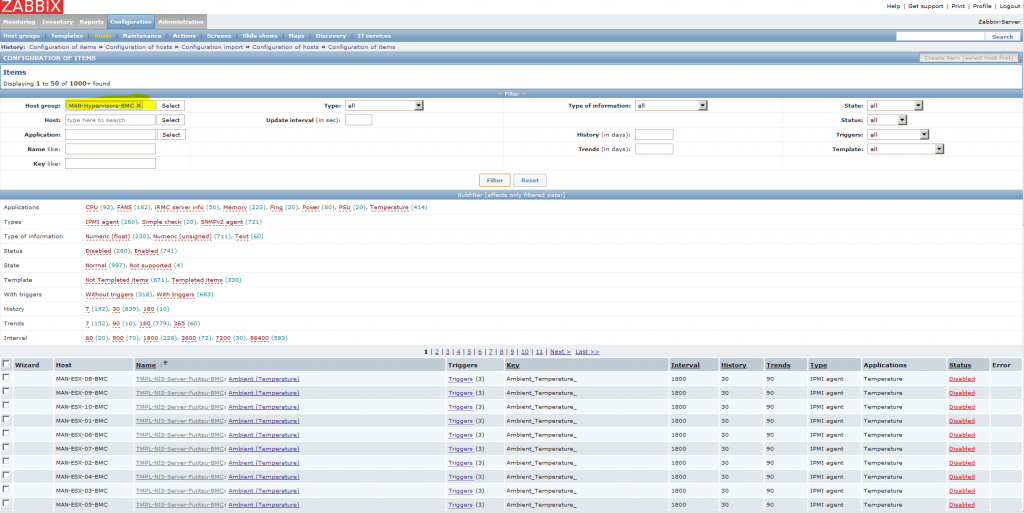
Solution nr. one would be tu use the filters to select all items in a specified host group and delte those items, but the applications, discovery rules and so on will still remain in the hosts and have to be deleted in a 2nd/3rd step.

See the Screenshot below:Zabbix Host configuration - item filters


My preferred solution for this problem is a simple regex based find/replace with Notepad++.
Herefor an export of the affected hosts is needed. The xml-file could be opend with NPP and the following regexes are needed for find/replace (CTRL+H) to remove the unwanted items.

[pastacode lang=”markdown” manual=”Find%20what%3A%20(%3Cdiscovery_rules%3E%5B%5Cs%5CS%5D*%3F%3C%5C%2Fdiscovery_rules%3E)%7C(%3Ctriggers%3E%5B%5Cs%5CS%5D*%3F%3C%5C%2Ftriggers%3E)%7C(%3Cinventory%3E%5B%5Cs%5CS%5D*%3F%3C%5C%2Finventory%3E)%7C(%3Citems%3E%5B%5Cs%5CS%5D*%3F%3C%5C%2Fitems%3E)%0A%0AReplace%20with%3A%20(%3F1%3Cdiscovery_rules%20%2F%3E)(%3F2%3Ctriggers%20%2F%3E)(%3F3%3Cinventory%20%2F%3E)(%3F4%3Citems%20%2F%3E)” message=”” highlight=”” provider=”manual”/]

In the above example multiple regexes with multiple replace-patterns are used to replace the items, discovery rules, triggers an inventory and reset it.

Remove Oracle ApEx from the database

Because Nessus seems to dislike Oracle ApEx we needed to remove it from the database.  Oracles manual regrading the removal is pretty straight forward (https://docs.oracle.com/database/121/HTMIG/trouble.htm#HTMIG270), but I wanted to do it in a single none intreactive line which makes it easier to do de removal automated.

so – here it is:

[pastacode lang=”bash” manual=”echo%20quit%20%7C%20sqlplus%20-S%20%22sys%2Fsys%20as%20sysdba%22%20%40%24ORACLE_HOME%2Fapex%2Fapxremov.sql%0A” message=”” highlight=”” provider=”manual”/]

Zabbix 1.8 to 2.2 Upgrade

Lately I was asked to help to upgrade Zabbix from 1.8 to 2.2 in a project. It wasn’t a problem to upgrade the templates – that was easily done with a xml-export/import but the hosts where kind of a challenge because the exported xml-files for the hosts itself pretty differs between 1.8 and 2.2.

Because i already had the PhpZabbixApi (https://github.com/confirm/PhpZabbixApi/blob/master/README.md) installed on the tared system i decided to write a little script which pareses the 1.8-host export and creates the hosts in 2.2. The script inc. the lib is attached at the end of the post.

I tested the script with Zabbix 1.8.6->2.2.10 and everything worked fine. Currently the script is capable of creating the hosts (with Zabbix-agent & SNMP-interface), creating the host groups and adding the hosts to the correct host group and also linking the correct templates to the host. However, the templates need to be already available on the target system to be linked correctly.

After extracting the script on the target Zabbix server the xml-import from the old system needs to be uploaded into the same directory as the script (scp) and the login data for Zabbix need to be adapted in the script. Afterwards the import can be started from a bash via:

[pastacode lang=”bash” manual=”” message=”” highlight=”” provider=”manual”/]

Zabbix1.8_2.2_upgrade


Get vCenter alarms into Zabbix via poll-method

Some time ago i wrote a post on how to forward vCenter alarms to Zabbix ( https://blog.fawcs.info/2015/05/getting-vcenter-alarms-to-zabbix/) and I have to admit, that this solutions is kind of a pain in the ass. I’m getting the alarm info from environmental varaibles which are automatically set by the vCenter when an alarm changes its status, but it seems that there is a “littel” problem with “overlapping” alarms. For example if there are occuring multiple alarms within a short period only the first alarm will be forwarded to zabbix, but non of the follwoing alarms. Besides that this is not an ideal solution I personally do not like my former approach because it’s an event driven approach. So if one event goes missing we have an inconsistent system :/

It’s quite some time since I wanted to redesign the solution and now I’m finally having some time ( and the pressure) to do so. 🙂
The new approach is based on using userparameters to execute a powershellscript on the vCenter to discover all active alarms and create items in Zabbix. At the moment I’m creating three item prototyes. One for the Timestamp when the alarm became active, another item for the acknowledged-state of the alarm and the last one for the severity of the alarm.

There are two userparemeters which run two powershell scripts. The first one (vcenter.alarm.polling.discovery.ps1) does the discovery and the second one (vcenter.alarm.polling.itemdata.ps1) is to get the data for the discoverd items.
There are also three triggers (one for each severity gray, yellow, red) which will be active als long as the alarm is not acknowledged.

You can download the scripts, userparameters and the template down below:
vCenterAlarmPolling


Additional findings:
Ther can occure problems if there are different addresses used to connect to the vcenter (eg. 127.0.0.1, loclahost, vcenterhostname, …)
It seems that the vCenter creates a sperate datacenter instance for every connection, so if you use the three examples from abovve you will end up creating three instances and mess up the script.


If special characters want to be passed to the powershellscript (e.g. special chars in passwords ord login with administrator@vsphere.local) the “UnsafeUserParameters=1” – parameter from the zabbix-agent.conf needs to be set to 1. (default value is 0)

Putty – Terminal “halts/freezes” after CTRL+S

Did you ever work with vi/nano (whatever)  and wanted to save a file?
If you are not that hardcore a linux person who does everything on a terminal and also works with Windows, you know that it is always a good idea to press CTRL+S once in a while to save your progress.

I press this shortcut automatically and it even happens to me while working on a putty session, which results in a “freezed” terminal session.
The reason for this behavior is that ctrl+s sends “XOFF” and putty stopps displaying any output, but still accepts keystrokes.

But its also easy to disable XOFF again – just press CTRL+Q and putty will continue to show your output on the screen. 🙂

Install Zabbix on Raspberry PI 2

Wouldn’t it be cool to monitor your home? For example all your devices, but also temperature and other sensors an have all that data accessible via a web interfaces?

I think it would so, i thought about setting up Zabbix for home monitoring, but on the RaPi B and B+ it’s not the most performant setup, So i decided to try it again with the PI2.

This post provides a short log on how I set it up.

At first we have to download the source from Zabbix’ SF-page because there is no official package for the ARM-architecture available.

[pastacode lang=”bash” message=”zabbix installation” highlight=”” provider=”manual”]

cd /opt
wget http://downloads.sourceforge.net/project/zabbix/ZABBIX%20Latest%20Stable/2.4.6/zabbix-2.4.6.tar.gz?r=http%3A%2F%2Fwww.zabbix.com%2Fdownload.php&ts=1441447329&use_mirror=skylink^C
mv zabbix-2.4.6.tar.gz\?r\=http\:%2F%2Fwww.zabbix.com%2Fdownload.php zabbix-2.4.6.tar.gz
tar xfvz zabbix-2.4.6.tar.gz
cd zabbix-2.4.6/


#With ./configure --help we can see all the availalbe switches which can be used to compile zabbix.
root@raspberrypi /opt/zabbix-2.4.6 # groupadd zabbix
root@raspberrypi /opt/zabbix-2.4.6 # useradd -g zabbix zabbix
root@raspberrypi /opt/zabbix-2.4.6 # ./configure --help


#I used the follwoing switches to compile the zabbix server and agent, use a MySQL-DB, enable jabber-support, lib-xml2 - which is needed for webmonitoring, net-snmp, ssh and curl which is alos needed for webmonitoring. IPMI can be useful if you also hav a realy server with a BMC to monitor. But for most homeusers the IPMI-option is not neede if you only want to monitor your home and thats it. If you have a LDAP/AD-environment where you want to integrate zabbix you also should use the ldap-switch, but I think most home users also do not have a directory service running at home. ;)

#If this command is run there will ocure some erroes in most cases because there are missing dependencies

./configure --enable-server --enable-agent --with-mysql --with-jabber --with-libxml2 --with-net-snmp --with-ssh2 --with-libcurl


apt-get install apache2 php5-mysql mysql-server mysql-common mysql-utilities libiksemel-dev libiksemel-utils libxml2-dev libxml2-utils libxml2 snmp libsnmp-dev libsnmp-perl libssh2-1-dev libssh2-1 libcurl3 libghc-curl-dev libmysql++-dev php5-gd

#now all dependencies should be resolved
./configure --enable-server --enable-agent --with-mysql --with-jabber --with-libxml2 --with-net-snmp --with-ssh2 --with-libcurl

#copy init scripts
cp /opt/zabbix-2.4.6/misc/init.d/debian/* /etc/init.d/
#copy webfrontend
cp -r /opt/zabbix-2.4.6/frontends/php/* /var/www/zabbix/
chown -R www-data:www-data /var/www/zabbix/


#create the database
#at first log in to your mysql-server as a root useradd and runn the following commands
mysql -uroot -p
create database zabbix character set utf8 collate utf8_bin;
CREATE USER 'zabbix'@'localhost' IDENTIFIED BY 'zabbix';
GRANT ALL PRIVILEGES ON zabbix.* TO 'zabbix'@'%' WITH GRANT OPTION;
mysql -uzabbix -pzabbix zabbix < /opt/zabbix-2.4.6/database/mysql/schema.sql
mysql -uzabbix -pzabbix zabbix < /opt/zabbix-2.4.6/database/mysql/images.sql
mysql -uzabbix -pzabbix zabbix < /opt/zabbix-2.4.6/database/mysql/data.sql

#adapt configuration files at /usr/local/etc/ like in the attached examples
#create dircetories for logfiles:
mkdir -p /var/log/zabbix
chown -R zabbix:zabbix /var/log/zabbix/

#create dirs for alert & external scripts 
mkdir -p /var/zabbix/alertscripts
mkdir -p /var/zabbix/externalscripts
chown -R zabbix:zabbix /var/zabbix/


#configure php-settings
vim /etc/php5/apache2filter/php.init
post_max_size = 16M
max_execution_time = 300
max_input_time = 300
#select timezone from http://php.net/manual/en/timezones.php and set:
date.timezone = 

#restart/reload webserver to accept changes
service apache2 restart
service zabbix-server restart
service zabbix-agent restart

#open http:///zabbix in browser and finish installation


[/pastacode]


zabbix-conf

Basic mail configuration for webserver and mailforwarding for root

Till now I didn’t configured any mail support for wordpress but today I wanted to enable wordpress to send mails to me and became aware that I didn’t configure postfix for my system.

In fact a basic configuration is quite easy. If the webserver should be able to send mails to an address of your choice you may hav to adapt the follwoing parameters in the /etc/postfix/main.cf:

myhostname = vps.fawcs.info
mydomain = fawcs.info
myorigin = $mydomain

After those three parameters are configured the postfix service has to be restarted: systemctl restart postfix.service

If there are still no mails comming in check if the /etc/php.ini is configured to use sendmail_path = /usr/sbin/sendmail -t -i

I also recogized that there are some mail in the inbox for the root user so I decided to also enable mail fowarding to get new mails directly to my mail-address instead of the root’s inbox.

Herfore the last line in /etc/aliases has to be uncommented to look like:
# Person who should get root’s mail
root: yourmail@yourdomain.info

Afterwards the postfix service has to be restarted once again and in the future all mails will be forwareded to the system.

if you have troubles receiving mails the mailq command is helpful to debug problems with unsent mails or mails which get rejected by the receiving mail server. A look at the /var/log/maillog logfile is also worth a try. 😉