Category Archives: Uncategorized

Customizing powershell prompt

After enabling OpenSSH on Windows I had the issue that powershell sessions could be mixed up quite easily as it does not display which host is opened in which session.

to work around that a custom prompt function can be specified in the powershell profile

powershell profile is loaded on startup of a powershell window. By default there is no file but it can be created. The file itself is referenced by the PS env $PROFILE.

PS C:\Users\usr> $PROFILE
C:\Users\usr\Documents\WindowsPowerShell\Microsoft.PowerShell_profile.ps1

To change the default prompt (PS C:\User\usr>) the file can be edited and a prompt function can be added:

function prompt{
	"$("[$([System.Environment]::UserName)@$([System.Environment]::MachineName)] > ")"
}

REF: https://docs.microsoft.com/en-us/powershell/module/microsoft.powershell.core/about/about_prompts?view=powershell-7.2

Refs for enabling OpenSSH in Windows:

Installation: https://docs.microsoft.com/en-us/windows-server/administration/openssh/openssh_install_firstuse?tabs=powershell

Configuration:

https://docs.microsoft.com/en-us/windows-server/administration/openssh/openssh_server_configuration

Monitoring Tasmota with Zabbix

The repository contains a python-script which can be used to subscribe to an MQTT-server (e.q. mosquitto) and forward all MQTT-message to Zabbix. There the Template can be used to monitore the values sent via MQTT. Currently the Template is mainly intended as an example and requires adaption to your current setup/configuration of tasmote.

https://gitlab.com/fawcs/zabbix_tasmota_mqtt

CVSS-Regex

Just a little regex to validate CVSSvector strings

^CVSS\:\d\.\d\/AV\:[N,A,L,P]\/AC\:[L,H]\/PR\:[N,L,H]\/UI\:[N,R]\/S\:[U,C]\/C\:[N,L,H]\/I\:[N,L,H]\/A\:[N,L,H]$

Additional JS-Scripts for CVSS-cacluation:

https://www.first.org/cvss/v3.1/use-design

Tasmota/Platformio error when compiling Tasmota for ESP8266 (firmware.elf section `.text’ will not fit in region `iram1_0_seg’ )

After changing my Tasmota ESP8266-dev environment to Visual Studio Code I ran into the problem that I always got the following error when trying to recompile my customized Tasmota firmware:

c:/users/username/.platformio/packages/toolchain-xtensa@1.40802.0/bin/../lib/gcc/xtensa-lx106-elf/4.8.2/../../../../xtensa-lx106-elf/bin/ld.exe: .pio\build\sonoff-sensors\firmware.elf section `.text' will not fit in region `iram1_0_seg'
collect2.exe: error: ld returned 1 exit status
*** [.pio\build\sonoff-sensors\firmware.elf] Error 1

Seems the problem is introduced by the updated Platformio 4 environemnt which ships some updated libraries that do not comply to the ESP-requirements. To work with Platformio 4 it is necessary to adapt the platformio.ini to match the following configuration:

[platformio]
build_dir = .pioenvs

[env:myesp8266env]
platform = espressif8266@1.5.0
... 
platformio.ini configuration file

https://github.com/platformio/platform-espressif8266/releases/tag/v1.5.0

Discussion on the Github bugtracker for the Tasmota project:
https://github.com/arendst/Sonoff-Tasmota/issues/6073#issuecomment-511111038

Suggested Webserver security settings

[pastacode lang=”apacheconf” manual=”%0A%23Security%20Settings%20start%0A%23https%3A%2F%2Fsecurityheaders.io%2F%3Fq%3Dblog.fawcs.info%26hide%3Don%26followRedirects%3Don%0A%23HSTS-enabled%0AHeader%20always%20set%20Strict-Transport-Security%20%22max-age%3D31536000%3B%20includeSubDomains%3B%20pre%0A%23Content-Security-Policy%0AHeader%20always%20set%20Content-Security-Policy%20%22default-src%20https%3A%20data%3A%20’unsafe-inline’%20’%0A%23Public-Key-Pins%0A%0A%0A%23X-Frame-Options%0AHeader%20always%20set%20X-Frame-Options%20%22SAMEORIGIN%22%0A%23X-XSS-Protection%0AHeader%20always%20set%20X-Xss-Protection%20%221%3B%20mode%3Dblock%22%0A%23X-Content-Type-Options%0AHeader%20always%20set%20X-Content-Type-Options%20%22nosniff%22%0A%0ASSLProxyEngine%20on%0ASSLEngine%20on%0ASSLProtocol%20all%20-SSLv2%20-SSLv3%20-TLSv1%0ASSLHonorCipherOrder%20on%0ASSLCipherSuite%20%22EECDH%2BECDSA%2BAESGCM%20EECDH%2BaRSA%2BAESGCM%20EECDH%2BECDSA%2BSHA384%20EECDH%2BECDSA%2BS%20!3DES%20!MD5%20!EXP%20!PSK%20!SRP%20!DSS%22%0A%0A%23Custom%20Settings%0ATraceEnable%20off%0AServerSignature%20Off%0AServerTokens%20Prod%0A” message=”” highlight=”” provider=”manual”/]

Next Thing – C.H.I.P – Driver cant be installed

UPDATE – 20181203:

or just use the microsoft driver as described on reddit – https://www.reddit.com/r/ChipCommunity/comments/5hndoj/setting_up_the_chip_under_win10_walkthrough/  


Today I got my new CHIP (https://nextthing.co) dev board/mini pc and tryed to set it up, but as I found out thats quite tricky to do.

Regarding to the documentation the chip only needs to be connected to a pc with a micro USB cable and is automatically installed as  serial device. After the installation the chip should be accessible via a COM-port with putty or any other program for serial communication.

So far so good, BUT … as I had to find out, the driver didn’t got installed and so it wasn’t accessible …

By default Windows should identify the device automatically and install the CDC Composite Gadget driver out of the box. But in my case it didn’t work.
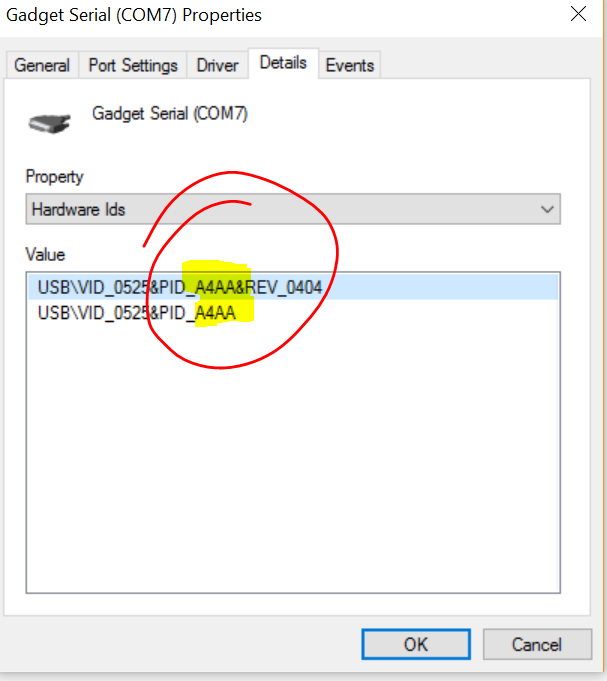
It seems that the identfier canged from A4A7 to A4AA:
cdc-hw-id

After some some googleing I found a driver on kernel.org which nearly worked.
https://www.kernel.org/doc/Documentation/usb/linux-cdc-acm.inf

But it would have been too easy if it worked out of the box. So I had to adapt the *.inf-file to match my HW-ID.
Change the follwoing lines

[pastacode lang=”python” manual=”%5BDeviceList%5D%0A%25DESCRIPTION%25%3DDriverInstall%2C%20USB%5CVID_0525%26PID_A4A7%2C%20USB%5CVID_1D6B%26PID_0104%26MI_02%2C%20USB%5CVID_1D6B%26PID_0106%26MI_00%0A%0A%5BDeviceList.NTamd64%5D%0A%25DESCRIPTION%25%3DDriverInstall%2C%20USB%5CVID_0525%26PID_A4A7%2C%20USB%5CVID_1D6B%26PID_0104%26MI_02%2C%20USB%5CVID_1D6B%26PID_0106%26MI_00%0A” message=”” highlight=”” provider=”manual”/]

to

[pastacode lang=”python” manual=”%5BDeviceList%5D%0A%25DESCRIPTION%25%3DDriverInstall%2C%20USB%5CVID_0525%26PID_A4AA%2C%20USB%5CVID_1D6B%26PID_0104%26MI_02%2C%20USB%5CVID_1D6B%26PID_0106%26MI_00%0A%0A%5BDeviceList.NTamd64%5D%0A%25DESCRIPTION%25%3DDriverInstall%2C%20USB%5CVID_0525%26PID_A4AA%2C%20USB%5CVID_1D6B%26PID_0104%26MI_02%2C%20USB%5CVID_1D6B%26PID_0106%26MI_00%0A” message=”” highlight=”” provider=”manual”/]


In short: replace A4A7 with A4AA 😉

Afterwards the driver could be installed and the chip should work (as long as you do not have Windows 10).
If you try to install the driver on a Windows 10 machine, Windows will complain about the unsigned driver and will not install the driver.
To get it work on Windows 10, the OS needs to be rebooted in option mode:
shutdown.exe /r /o /f /t 00

When Windows starts up again the driver signature check could be disabled for this start and after the system is up again it’s possible to install the driver.

Continue reading Next Thing – C.H.I.P – Driver cant be installed

Cisco Deployment Guide

Today I received an useful link regarding Cisco L2 Access Switch-deployments with some interesting settings I wasn’t aware of till know.
The document is available via the following Link.

http://www.cisco.com/c/dam/en/us/td/docs/solutions/CVD/Oct2015/CVD-Campus_LAN_L2_Access_Simplified_Dist_Deployment-Oct2015.pdf

VMware RVC not working after Update – Error 193: %1 is not a valid Win32 application

Today I once again upgraded a vCenter installation and afterwards I wanted to use the RVC, but I always got the following error when trying to open the RVC:

C:/Program Files/VMware/vCenter Server/ruby/lib/ruby/2.1.0/rubygems/core_ext/kernel_require.rb:55:in `require’: 193: %1 is not a valid Win32 application. – C:/Program Files/VMware/vCenter Server/ruby/lib/ruby/2.1.0/x64-mingw32/zlib.so (LoadError)
…..

So … hm … fubar. It seems that there still remain some old files on the FS when upgrading and those old files seem to cause some trouble.

To fix the problem you could try to uninstall just the vmware-ruby.msi and vmware-rvc.msi (I uninstalled both, maybe it’s enough to uninstall only the rvc-package) and reinstall. After uninstalling the file there will still be an folder rvc at “C:\Program Files\VMware\vCenter Server” – rename it before reinstallling the MSI-packages to get a clean installation!
Attention – VMware passes some parameters to the MSI-files . If you just doubleclick on the files, they will get installed, but not under:
C:\Program Files\VMware\vCenter Server

I used the parameters from the upgrade which were:

F:\vCenter-Server\Packages>msiexec /i VMware-ruby.msi ALLUSERS=1 ARPSYSTEMCOMPON
ENT=1 INSTALLPATH=”C:\Program Files\VMware\vCenter Server\” APPDATAPATH=”C:\Prog
ramData\VMware\vCenterServer\”

F:\vCenter-Server\Packages>msiexec /i VMware-rvc.msi ALLUSERS=1 ARPSYSTEMCOMPONE
NT=1 INSTALLPATH=”C:\Program Files\VMware\vCenter Server\” APPDATAPATH=”C:\Progr
amData\VMware\vCenterServer\”

VMware JRE update fails

While I was trying to update a VMware vCenter 6 to 6u1 today I had the problem, that the upgrade failed permanently, because of the following error:
Installation of component VMware JRE standalone installer failed with error code ‘3010’. Check the logs for more details.


Searching on the net did not bring up any results regarding this error, so I had to debug it myself. I tried to call the vmware-jre.msi directly from the DVD-ISO, and at first it seemd to run through, but, after some minutes of waiting, the MSI opened a pop up and asked for the installation-CD for vmware-jre.msi. It seemd that the new MSI wanted to uninstall the old msi-package and when trying to uninstall the old package the problem with the installation-media-dialoge popped up.

Trying to install the old version from the already installed vCenter also ended up in asking for an installation media.

At the end I started an administrative cmd-window and ran “msiexec /uninstall vmware-jre.msi” which uninstalled the old JRE and afterwards an update-process of the vCenter was possible.

Dump from the Error-Log:


[pastacode lang=”bash” message=”VMware JRE – Installation – Error log” highlight=”” provider=”manual”]

Stage: install stage: install-packages / vmware-jre.msi
2015-12-17 13:53:07.820Z| vcsInstUtil-3018519| I: LaunchPkgMgr: Telling child to install "X:\vCenter-Server\Packages\vmware-jre.msi" with "INSTALLPATH="C:\Program Files\VMware\vCenter Server\" VM_UPDATE=1" details 0
2015-12-17 13:53:07.820Z| vcsInstUtil-3018519| I: wWinMain: Exe is told to run "X:\vCenter-Server\Packages\vmware-jre.msi" with "INSTALLPATH="C:\Program Files\VMware\vCenter Server\" VM_UPDATE=1" details 0
2015-12-17 13:53:18.882Z| vcsInstUtil-3018519| E: wWinMain: MSI result of install of "X:\vCenter-Server\Packages\vmware-jre.msi" may have failed: 3010 (0x00000bc2)
2015-12-17 13:53:18.882Z| vcsInstUtil-3018519| E: LaunchPkgMgr: Operation on vmware-jre.msi appears to have failed: 3010 (0x00000bc2)
2015-12-17 13:53:18.882Z| vcsInstUtil-3018519| I: PitCA_MessageBox: Displaying message: "Installation of component VMware JRE standalone installer failed with error code '3010'. Check the logs for more details."
2015-12-17 13:59:25.191Z| vcsInstUtil-3018519| I: LaunchPkgMgr: Telling child to revert transaction

[/pastacode]

UPDATE:
The MSI-packages are located on the vCenter installation disk. The iso can be downloaded from: https://my.vmware.com/web/vmware/details?productId=491&downloadGroup=VC600U1 (VMware Account needed)
Once the ISO is downloaded it can be mounted/opened (eg. 7zip) and the MSI-Packages are located at: \vCenter-Server\Packages\

vCetnerDiskContent

Mounting the ISO and chaning with an administrative commandline to the above path is the easiest way to uninstall the file. Otherwise the DVD-content could also be extracted to any directory.

Zabbix interface status – Error reset procedure

Zabbix is quite cool, but there are still some minor problems which make life a littel bit harder (or just do not look too good).

One of this little bugs it, that if you add the wrong interface to your host and try to query it (and an error is returend) – results in an red icon for the corresponding intrface in the hosts-overview.

zbx-if-error

The only way (I know) to reset those interface is to delete the host and create it new, or the easier way would be to clone the host and delte the old one. To be honest – I don’t like any of those two possiblities, so i decided to find another way.

As a matter of fact, the info is stored in the database so we could reset the icon in the DB:  herefor we need to log in to the database and find the correct table. I assume you know hot wo log in to your DB 😉
The table which stores the infor about the interfaces would be the “hosts”-table. Ths table contains a column called “available” which indicates the interface status. For the zabbix agent it’s just called available, for snmp, ipmi, jmx, you alway the the type as a prefix – so snmp: snmp_available. the column stores an integer from 0 to 3 with:
0=if not in use (gray)
1=if in use and everything is fine =green
2=if in use and an error occured=red
so by updating the DB-entry we could reset the icon-indicator for a specific host.

UPDATE hosts SET available=0 WHERE hostid=12345;

… would set the icon for the Agent to gray for the host 12345. The host-id could be obtained by hovering over the link to the host or opening the host and afertwards it’s displayed in the address bar.