If a WSUS server fails to obtain updates with the following error: “wsus the request failed with http status 404 not found” this might be because it still uses an old/outdated URL (https://fe2.update.microsoft.com/v6) to obtain the updates from.
This can be checked and changed with the following PS1 Snippet:
$server = Get-WsusServer
$config = $server.GetConfiguration()
# Check current settings before you change them
$config.MUUrl
$config.RedirectorChangeNumber
# Update the settings if MUUrl is https://fe2.update.microsoft.com/v6
$config.MUUrl = "https://sws.update.microsoft.com"
$config.RedirectorChangeNumber = 4002
$config.Save()
iisreset
Restart-Service *Wsus* -v
iPXE is pretty nice when it comes to network booting computers as it offers lots of scripting functionality at a very early stage of the deployment as it could be configured to load an iPXE script from an webserver. The script provided by the webserver itself can be created dynamically with any scripting language of your choice depeding on parameters that get handed over.
That provides the possibilityty, to automatically roll out systems that have been specified in an inventory. In case a machine can not be found in the inventory you could provide a menu where an users can manually choose what shall be done and lots more.
Not a problem for bare metal machines and also most VMs. However – Oracle with Virtualbox – also seem to have discovered the advantages of virtual box for their virtual machines and every Virtualbox VM will initially load iPXE. As that’s an iPXE binary with very little capabilities, this could cause issues when trying to PXE boot an Oracle Virtualbox VM via iPXE as the dhcp-server used for iPXE will get the iPXE identifier form Oracls built in iPXE binary instead of the one that will be initially provided via the DHCP-server.
If the iPXE-script, which is loaded in the second stage, uses the console-command, the deployment will halt as that functionality is not supported by Oracles iPXE binary.
To work around this problem we can modify the user-class identifier provided by our iPXE binary to provide something different than the default “iPXE”-string and use that to make sure that our dhcp-server will always provide our ipxe binary in case a new client tires to PXE boot.
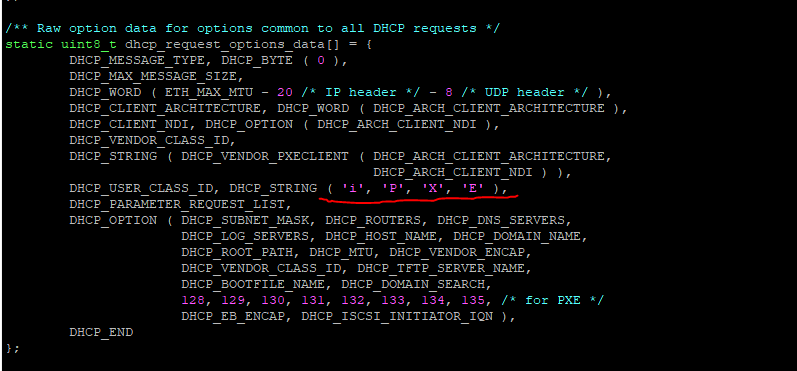
To change the “iPXE” userclass string to a custom string, you have to open the “src/net/udp/dhcp.c” file, once the iPXE repository was checked out.
The interesting part is somewhere down at line 90 in the file:
If you don’t want to change to much code – just change any character to somthing else:
Whatever is defined there will be the new user-class identifier that can be used to determine if our custom iPXE was loaded or if the iPXE binary from another vendor is used.
Once the change was done the ipxe file needs to be recompiled and copied to the tftp servers directory.
The check for the custom user-class identifier in dnsmasq would look like: (CSTM as the userclass identifier)
...

# Boot for iPXE. The idea is to send two different
# filenames, the first loads iPXE, and the second tells iPXE what to
# load. The dhcp-match sets the ipxe tag for requests from iPXE.
dhcp-boot=ipxe.efi
dhcp-userclass=set:ipxe,CSTM
dhcp-boot=tag:ipxe,http://10.16.96.16/script.ipxe

...
A nice example on how dnsmasq can be configured for iPXE can be found at in the iPXE Forum.
When using the telephone activiation select the option that MS sends you a link to an activation page. http://md.vivr.io/XxX0c0CUse the link and the following commands on the computer to extracte the activaition ID from the system, paste it on the webinterface and copy the confirmation ID back to the system.To paste the activiation ID on the Microsoft Website use the cscript command to print the ID to the command prompt, copy it to Keepass in the autotype field and use the autotype option to paste the blocks.To strip the response NPP + the follwoing regex can be used: [A-Z]|\t|\n -> Strips all upper case characters, tabstops and CRs
Tools Needed:
KeePass (or any other autotype tool)
Notepad++ NPP-Regex for search and replace: [A-Z]|\t|\n
Commands:
#Install Productkey

slmgr /ipk <ProductKey>
#Display activation ID cscript C:\Windows\System32\slmgr.vbs /dti
Today I received an useful link regarding Cisco L2 Access Switch-deployments with some interesting settings I wasn’t aware of till know.
The document is available via the following Link.
If you need to mount a lot of ISOs on a system than you could run into the problem, that you do not have free loop devices left.
There are several solutions from running “MAKEDEV -v /dev/loop” at boot time (e.g. add it to rc.local) to creating a file called loop.conf at /etc/modprobe.d/ and inserting the follwoing line:
# grub.conf generated by anaconda
#
# Note that you do not have to rerun grub after making changes to this file
# NOTICE:  You have a /boot partition.  This means that
#          all kernel and initrd paths are relative to /boot/, eg.
#          root (hd0,0)
#          kernel /vmlinuz-version ro root=/dev/mapper/vg1-root
#          initrd /initrd-[generic-]version.img
#boot=/dev/sda
default=0
timeout=5
splashimage=(hd0,0)/grub/splash.xpm.gz
hiddenmenu
password --encrypted ******************************************************************
title Red Hat Enterprise Linux 6 (2.6.32-504.el6.x86_64)
        root (hd0,0)
        kernel /vmlinuz-2.6.32-504.el6.x86_64 ro root=/dev/mapper/vg1-root rd_NO_LUKS LANG=en_US.UTF-8  KEYBOARDTYPE=pc KEYTABLE=de-latin1-nodeadkeys rd_NO_MD rd_LVM_LV=vg1/root SYSFONT=latarcyrheb-sun16 rd_LVM_LV=vg1/swap crashkernel=auto rd_NO_DM max_loop=128
        initrd /initramfs-2.6.32-504.el6.x86_64.img
[/pastacode]
instead of makedev (which creates 264 loop devices) the following snipped can be used:
I got the following Error after installing the MDT on my system and trying to update a Deploymentsahre which is located on my NAS.
On technet i read a tipp about restarting the machine after installing the MS AIK but that didn’t fix my problem. After another 5 mins of investigations I found out that wrong permissions could also be the reaseon for the error.
As I’m using the MDT on my private PC which has a non Admin user as default user I retried it with admin rights and now it works.
So if you’r also encountering this error – check your permissions.