All posts by Fawcs

The author is working as an IT-Systems Engineer for an Austrian company and has spezialiced on Linux (RHEL), Deployment and Monitoring but is also working with VMware, Windows, Cisco, ...

Apache – force autocomplete=off for password fields

If 3rd party software is installed it is quite likely that the autocomplete attribute for password fields is not set to off. Editing such settings directly in the sourceode is possible most of the time, but it’s not the nicest way and you also run into the problem that everything could be gone again after an update of the software.

A nice workaround is to use the substitute module to accomplish that.

[pastacode lang=”markup” manual=”%3CLocation%20%22%2F%22%3E%0A%20%20%20%20AddOutputFilterByType%20SUBSTITUTE%20text%2Fhtml%0A%20%20%20%20Substitute%20%22s%7C%3Cinput%20type%3Dpassword%7C%3Cinput%20type%3Dpassword%20autocomplete%3Doff%7Ci%22%0A%3C%2FLocation%3E” message=”disable autocomplete for password fields” highlight=”” provider=”manual”/]

Suggested Webserver security settings

[pastacode lang=”apacheconf” manual=”%0A%23Security%20Settings%20start%0A%23https%3A%2F%2Fsecurityheaders.io%2F%3Fq%3Dblog.fawcs.info%26hide%3Don%26followRedirects%3Don%0A%23HSTS-enabled%0AHeader%20always%20set%20Strict-Transport-Security%20%22max-age%3D31536000%3B%20includeSubDomains%3B%20pre%0A%23Content-Security-Policy%0AHeader%20always%20set%20Content-Security-Policy%20%22default-src%20https%3A%20data%3A%20’unsafe-inline’%20’%0A%23Public-Key-Pins%0A%0A%0A%23X-Frame-Options%0AHeader%20always%20set%20X-Frame-Options%20%22SAMEORIGIN%22%0A%23X-XSS-Protection%0AHeader%20always%20set%20X-Xss-Protection%20%221%3B%20mode%3Dblock%22%0A%23X-Content-Type-Options%0AHeader%20always%20set%20X-Content-Type-Options%20%22nosniff%22%0A%0ASSLProxyEngine%20on%0ASSLEngine%20on%0ASSLProtocol%20all%20-SSLv2%20-SSLv3%20-TLSv1%0ASSLHonorCipherOrder%20on%0ASSLCipherSuite%20%22EECDH%2BECDSA%2BAESGCM%20EECDH%2BaRSA%2BAESGCM%20EECDH%2BECDSA%2BSHA384%20EECDH%2BECDSA%2BS%20!3DES%20!MD5%20!EXP%20!PSK%20!SRP%20!DSS%22%0A%0A%23Custom%20Settings%0ATraceEnable%20off%0AServerSignature%20Off%0AServerTokens%20Prod%0A” message=”” highlight=”” provider=”manual”/]

Windwos telephone activiation – shortcut

When using the telephone activiation select the option that MS sends you a link to an activation page. http://md.vivr.io/XxX0c0C Use the link and the following commands on the computer to extracte the activaition ID from the system, paste it on the webinterface and copy the confirmation ID back to the system. To paste the activiation ID on the Microsoft Website use the cscript command to print the ID to the command prompt, copy it to Keepass in the autotype field and use the autotype option to paste the blocks. To strip the response NPP + the follwoing regex can be used: [A-Z]|\t|\n -> Strips all upper case characters, tabstops and CRs


Tools Needed:

  • KeePass (or any other autotype tool)
  • Notepad++
    NPP-Regex for search and replace: [A-Z]|\t|\n


Commands:

#Install Productkey
slmgr /ipk <ProductKey>

#Display activation ID
cscript C:\Windows\System32\slmgr.vbs /dti

From <https://social.technet.microsoft.com/Forums/windows/de-DE/3ead2d77-00fc-4c06-b4c0-82eae0ebc2bc/save-slmgr-dli-output-to-text-file?forum=w7itproinstall>

#install confirmation ID from Microsoft
slmgr /atp <Confirmation ID>

#Check Status
slmgr /dlv

OR
slmgr /dli

From <http://www.thewindowsclub.com/view-licensing-status-activation-id-windows-slmg

Create you onw 4to6-tunnel / Access IPv6 service from IPv4 address

With my recent ISP-change for my internet at home there where quite a lot of changes. One of that changes was, that UPC – my current provider – uses DualStack Lite.
For me it’s the first ISP that really provides IPv6. So that’s pretty cool and I finally had the chance (was forced) into digging deeper into IPv6.

In general everything is working quite well but, as it’s dual stack lite my router doesn’t provide an option to do some portforwarding to one of my hosts inside my local network. At least not for IPv4 connections. So I have no chance to access one of my devices via my public IPv4 address what becomes a problem when I want to connect to my home network via VPN from an IPv4 only network.

I couldn’t find any suitable 4to6 tunnel broker that lets me access my IPv6-devices through an IPv4 address, but luckily I have a VPS that runs on real dualstack and therefor has an IPv4 and IPv6 address.

So to access my IPV6 VPN server in my private network from an IPv4 only network I created an SSH-tunnel from my VPN-server (that runs on a Raspberry PI) to my VPS and forwarded the OpenVPN port.

To do that the VPS’ sshd-configuration needs to be adapted to expose forwarded ports to it’s public IP-address(es). For that the following setting needs to be added to/ changed in the sshd_config:

[pastacode lang=”bash” manual=”GatewayPorts%20yes” message=”” highlight=”” provider=”manual”/]


After that I created the following script on my VPN-Raspberry:

[pastacode lang=”bash” manual=”%23!%2Fbin%2Fbash%0A%0AvarConnectionString%3D%22-nNT%20-R%201194%3Alocalhost%3A1194%20%3Cusername%3E%40%3Cservername%3E%20-p%20%3Cport%3E%22%0A%0Aif%20%5B%5B%20%24(ps%20aux%20%7C%20grep%20-v%20%22grep%22%20%7C%20grep%20%22%24(echo%20%24varConnectionString%20%7C%20sed%20’s%2F%5E-%2F%5C%5C-%2Fg’)%22)%20%5D%5D%3B%20then%0A%0Aecho%20%22Found%20active%20connection%22%0A%0Aelse%0A%0Aecho%20%22No%20active%20connection%20found%22%0Assh%20%24(echo%20%24varConnectionString)%20%26%0Afi” message=”create SSH-tunnel” highlight=”” provider=”manual”/]

That script is added to be exectuted every half hour as a cronjob. So if the connection (for whatever reason) gets diconnected it will automatically reconnect to the VPS and forward the port again.


ORACLE – Convert datetime to epoch / unixtimestamp

It seems Oracle DB doesn’t provide a function to create a unix timestamp from an internal datetime. I have to admit – I’m kinda disappointed about that, but OK – its Oracle …

So, how can we get a timestamp from Oracle. I have googled quite a time, but non of the solutions google offered me worked, so i it’s time to think about it by myself and ended up with the following solution:

[pastacode lang=”sql” manual=”select%20(extract(day%20from%20(EVENT_TIME%20%20-%20to_date(’01-JAN-1970’%2C’DD-MON-YYYY’)))*86400%2Bextract(hour%20from%20EVENT_TIME)*3600%2Bextract(minute%20from%20EVENT_TIME)*60%2Bextract(second%20from%20EVENT_TIME))%20as%20EPOCH%20from%20SOMETABLE%20order%20by%20event_time%20DESC%3B%0A” message=”” highlight=”” provider=”manual”/]

At first I subtract the start of the epoch from my current timestamp. this will provide me the days since 1970-01-01. Afterwards I extract hours, minutes and seconds from the timestamp and with all those data it’s possible to calc the timestamp of the specific datetime.

Flashing NextThing C.H.I.P. with a Raspberry Pi

Today I somehow bricked my CHIP (I think it wasn’t the wised idea to set the system-target to network_online) as I didn’t get access via serial connection or ssh.
It wasn’t that much of a problem as I wanted to set up the CHIP as a headless system.
So the journey begins (http://docs.getchip.com/chip.html#installing-c-h-i-p-sdk) with setting up Virtual Box + Extension pack and installing vagrant on my Windows 10 (Git was already installed).

After everything was installed I started the VM wich was setup by vagrant and ran the chip-update-firmware.sh script to start the upgrade, but it failed with “Waiting for fel……………………………TIMEOUT”.
The reason was, that regardless of the USB-rules in the Vagrantfile, the CHIP was not available in the VM. Easy to check with “lsusb”. No Big deal – As the VM is available in the VirtualBox Manager we can boot it up from there and just attach the CHIP-USB-Device to the VM.

waiting for fel…OK -> 🙂
BUT:
waiting for fastboot……………………………TIMEOUT
-> 🙁

So, it seems that after the reboot of the CHIP windows is not recognizing it the right way and also has some problems to pass it through to the VM.

I dind’t find a fix for that problem, but reportedly a physical Ubuntu installation should would (regarding to some forum post on the NextThing BBS). Too bad I only have Fedora on a laptop, but no Ubuntu – but I had a Raspberry which i was currently not using, so I gave it a try and it worked out quite nice.

I used a “Jessy lite” and installed the following packages:

[pastacode lang=”bash” manual=”sudo%20apt-get%20install%20android-tools-fastboot%C2%A0u-boot-tools%20u-boot%20cbootimage%C2%A0uuid-dev%20libacl1-dev%20liblzo2-dev%C2%A0libusb-1.0-0-dev%20libusb%2B%2B-dev%20libusb-1.0-0%20libusb-dev%20git%0Agit%20clone%20https%3A%2F%2Fgithub.com%2FNextThingCo%2FCHIP-SDK%0Acd%C2%A0CHIP-SDK%0Asudo%20.%2Fsetup_ubuntu1404.sh%0Acd%C2%A0CHIP-Tools%0Asudo%20.%2Fchip-legacy-update.sh%20-f%20-s” message=”Install packages and flash the CHIP” highlight=”” provider=”manual”/]
(I don’t think that all the packages are needed, but i got some errors and hence installed everything I thought fix those errors)
After that & a reboot of my CHIP i was able to access it again with:

screen /dev/ttyACM0 115200


Next Thing – C.H.I.P – Driver cant be installed

UPDATE – 20181203:

or just use the microsoft driver as described on reddit – https://www.reddit.com/r/ChipCommunity/comments/5hndoj/setting_up_the_chip_under_win10_walkthrough/  


Today I got my new CHIP (https://nextthing.co) dev board/mini pc and tryed to set it up, but as I found out thats quite tricky to do.

Regarding to the documentation the chip only needs to be connected to a pc with a micro USB cable and is automatically installed as  serial device. After the installation the chip should be accessible via a COM-port with putty or any other program for serial communication.

So far so good, BUT … as I had to find out, the driver didn’t got installed and so it wasn’t accessible …

By default Windows should identify the device automatically and install the CDC Composite Gadget driver out of the box. But in my case it didn’t work.
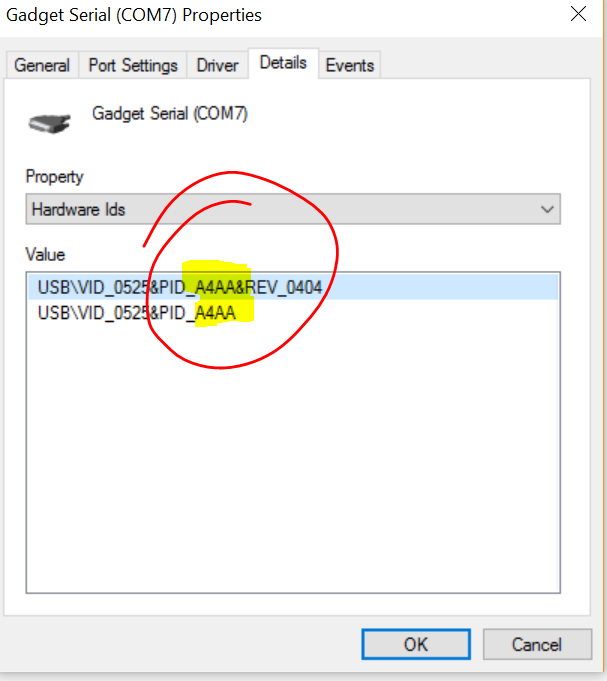
It seems that the identfier canged from A4A7 to A4AA:
cdc-hw-id

After some some googleing I found a driver on kernel.org which nearly worked.
https://www.kernel.org/doc/Documentation/usb/linux-cdc-acm.inf

But it would have been too easy if it worked out of the box. So I had to adapt the *.inf-file to match my HW-ID.
Change the follwoing lines

[pastacode lang=”python” manual=”%5BDeviceList%5D%0A%25DESCRIPTION%25%3DDriverInstall%2C%20USB%5CVID_0525%26PID_A4A7%2C%20USB%5CVID_1D6B%26PID_0104%26MI_02%2C%20USB%5CVID_1D6B%26PID_0106%26MI_00%0A%0A%5BDeviceList.NTamd64%5D%0A%25DESCRIPTION%25%3DDriverInstall%2C%20USB%5CVID_0525%26PID_A4A7%2C%20USB%5CVID_1D6B%26PID_0104%26MI_02%2C%20USB%5CVID_1D6B%26PID_0106%26MI_00%0A” message=”” highlight=”” provider=”manual”/]

to

[pastacode lang=”python” manual=”%5BDeviceList%5D%0A%25DESCRIPTION%25%3DDriverInstall%2C%20USB%5CVID_0525%26PID_A4AA%2C%20USB%5CVID_1D6B%26PID_0104%26MI_02%2C%20USB%5CVID_1D6B%26PID_0106%26MI_00%0A%0A%5BDeviceList.NTamd64%5D%0A%25DESCRIPTION%25%3DDriverInstall%2C%20USB%5CVID_0525%26PID_A4AA%2C%20USB%5CVID_1D6B%26PID_0104%26MI_02%2C%20USB%5CVID_1D6B%26PID_0106%26MI_00%0A” message=”” highlight=”” provider=”manual”/]


In short: replace A4A7 with A4AA 😉

Afterwards the driver could be installed and the chip should work (as long as you do not have Windows 10).
If you try to install the driver on a Windows 10 machine, Windows will complain about the unsigned driver and will not install the driver.
To get it work on Windows 10, the OS needs to be rebooted in option mode:
shutdown.exe /r /o /f /t 00

When Windows starts up again the driver signature check could be disabled for this start and after the system is up again it’s possible to install the driver.

Continue reading Next Thing – C.H.I.P – Driver cant be installed

VMware Workstation Player – No Bridge Adapter available

Lately Microsoft convinced me to upgrade my Windows 7 @ home up to Windows 10. When I upgraded my Windows I checked all the installed tools for Upgrades and also upgrade my old VMware Player 6 to the new VMware Workstation Player 12.
Today I was playing with MDT at home and wanted to set up a test VM to check if everything is working, but I was not able to get the bridged interface working.
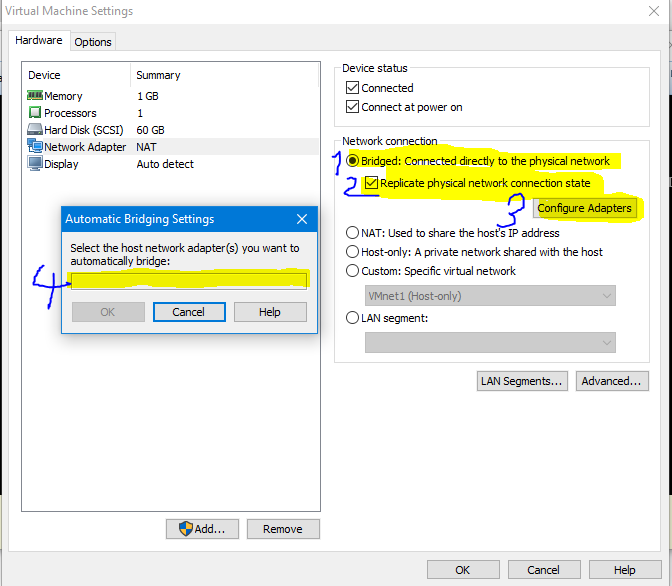
I was able to selct it, but I didn’t get an IP from my DHCP so I thought I’ll disable all adapter except the LOM which is connected to my Router, but there were no adapters. 🙁

VMwareWokrstationPlayerBridge


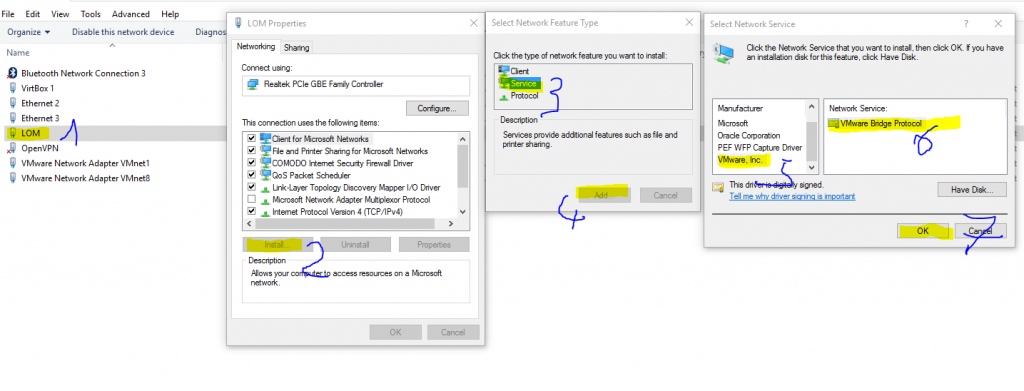
After a little bit of investigating I found out, that my LOM didn’t have the VMware Bridge Service installed. VMwareBridgeService

After installing the service I was able to set up the bridge adapter for the VM.


Zabbix – Clear hosts from untemplated items

Sometimes you run into the problem, that you have a host which had a template attached but somebody wanted to replace the template or something like that and unfortunately hit just “Unlink” instead of “Unlink and Clear” and all the items are still in the host.

If you have only one host it’s normaly no problem to delete all items per hand, but if you have multiple of those hosts it’s quite some work do remove the old items.

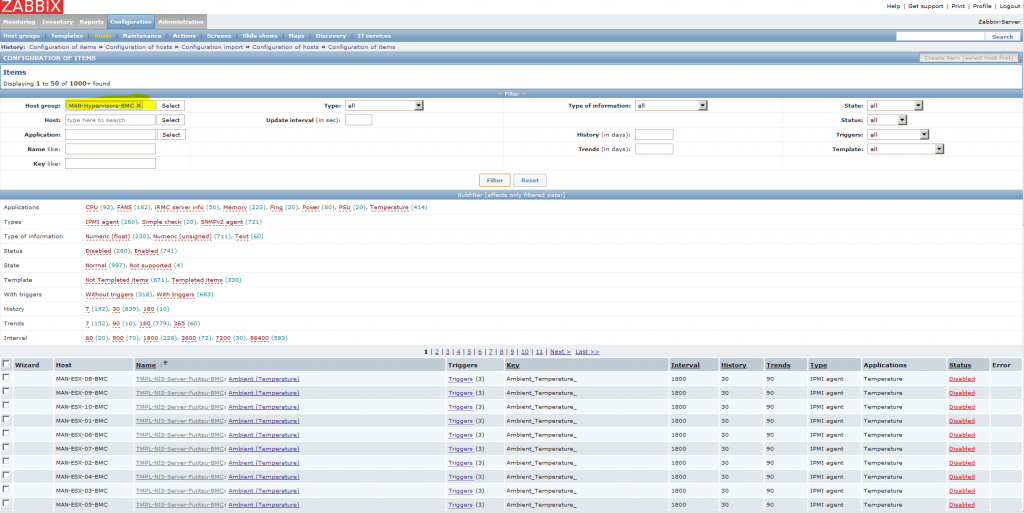
Solution nr. one would be tu use the filters to select all items in a specified host group and delte those items, but the applications, discovery rules and so on will still remain in the hosts and have to be deleted in a 2nd/3rd step.

See the Screenshot below:Zabbix Host configuration - item filters


My preferred solution for this problem is a simple regex based find/replace with Notepad++.
Herefor an export of the affected hosts is needed. The xml-file could be opend with NPP and the following regexes are needed for find/replace (CTRL+H) to remove the unwanted items.

[pastacode lang=”markdown” manual=”Find%20what%3A%20(%3Cdiscovery_rules%3E%5B%5Cs%5CS%5D*%3F%3C%5C%2Fdiscovery_rules%3E)%7C(%3Ctriggers%3E%5B%5Cs%5CS%5D*%3F%3C%5C%2Ftriggers%3E)%7C(%3Cinventory%3E%5B%5Cs%5CS%5D*%3F%3C%5C%2Finventory%3E)%7C(%3Citems%3E%5B%5Cs%5CS%5D*%3F%3C%5C%2Fitems%3E)%0A%0AReplace%20with%3A%20(%3F1%3Cdiscovery_rules%20%2F%3E)(%3F2%3Ctriggers%20%2F%3E)(%3F3%3Cinventory%20%2F%3E)(%3F4%3Citems%20%2F%3E)” message=”” highlight=”” provider=”manual”/]

In the above example multiple regexes with multiple replace-patterns are used to replace the items, discovery rules, triggers an inventory and reset it.

Remove Oracle ApEx from the database

Because Nessus seems to dislike Oracle ApEx we needed to remove it from the database.  Oracles manual regrading the removal is pretty straight forward (https://docs.oracle.com/database/121/HTMIG/trouble.htm#HTMIG270), but I wanted to do it in a single none intreactive line which makes it easier to do de removal automated.

so – here it is:

[pastacode lang=”bash” manual=”echo%20quit%20%7C%20sqlplus%20-S%20%22sys%2Fsys%20as%20sysdba%22%20%40%24ORACLE_HOME%2Fapex%2Fapxremov.sql%0A” message=”” highlight=”” provider=”manual”/]