All posts by Fawcs

The author is working as an IT-Systems Engineer for an Austrian company and has spezialiced on Linux (RHEL), Deployment and Monitoring but is also working with VMware, Windows, Cisco, ...

Putty – Terminal “halts/freezes” after CTRL+S

Did you ever work with vi/nano (whatever)  and wanted to save a file?
If you are not that hardcore a linux person who does everything on a terminal and also works with Windows, you know that it is always a good idea to press CTRL+S once in a while to save your progress.

I press this shortcut automatically and it even happens to me while working on a putty session, which results in a “freezed” terminal session.
The reason for this behavior is that ctrl+s sends “XOFF” and putty stopps displaying any output, but still accepts keystrokes.

But its also easy to disable XOFF again – just press CTRL+Q and putty will continue to show your output on the screen. 🙂

VMware JRE update fails

While I was trying to update a VMware vCenter 6 to 6u1 today I had the problem, that the upgrade failed permanently, because of the following error:
Installation of component VMware JRE standalone installer failed with error code ‘3010’. Check the logs for more details.


Searching on the net did not bring up any results regarding this error, so I had to debug it myself. I tried to call the vmware-jre.msi directly from the DVD-ISO, and at first it seemd to run through, but, after some minutes of waiting, the MSI opened a pop up and asked for the installation-CD for vmware-jre.msi. It seemd that the new MSI wanted to uninstall the old msi-package and when trying to uninstall the old package the problem with the installation-media-dialoge popped up.

Trying to install the old version from the already installed vCenter also ended up in asking for an installation media.

At the end I started an administrative cmd-window and ran “msiexec /uninstall vmware-jre.msi” which uninstalled the old JRE and afterwards an update-process of the vCenter was possible.

Dump from the Error-Log:


[pastacode lang=”bash” message=”VMware JRE – Installation – Error log” highlight=”” provider=”manual”]

Stage: install stage: install-packages / vmware-jre.msi
2015-12-17 13:53:07.820Z| vcsInstUtil-3018519| I: LaunchPkgMgr: Telling child to install "X:\vCenter-Server\Packages\vmware-jre.msi" with "INSTALLPATH="C:\Program Files\VMware\vCenter Server\" VM_UPDATE=1" details 0
2015-12-17 13:53:07.820Z| vcsInstUtil-3018519| I: wWinMain: Exe is told to run "X:\vCenter-Server\Packages\vmware-jre.msi" with "INSTALLPATH="C:\Program Files\VMware\vCenter Server\" VM_UPDATE=1" details 0
2015-12-17 13:53:18.882Z| vcsInstUtil-3018519| E: wWinMain: MSI result of install of "X:\vCenter-Server\Packages\vmware-jre.msi" may have failed: 3010 (0x00000bc2)
2015-12-17 13:53:18.882Z| vcsInstUtil-3018519| E: LaunchPkgMgr: Operation on vmware-jre.msi appears to have failed: 3010 (0x00000bc2)
2015-12-17 13:53:18.882Z| vcsInstUtil-3018519| I: PitCA_MessageBox: Displaying message: "Installation of component VMware JRE standalone installer failed with error code '3010'. Check the logs for more details."
2015-12-17 13:59:25.191Z| vcsInstUtil-3018519| I: LaunchPkgMgr: Telling child to revert transaction

[/pastacode]

UPDATE:
The MSI-packages are located on the vCenter installation disk. The iso can be downloaded from: https://my.vmware.com/web/vmware/details?productId=491&downloadGroup=VC600U1 (VMware Account needed)
Once the ISO is downloaded it can be mounted/opened (eg. 7zip) and the MSI-Packages are located at: \vCenter-Server\Packages\
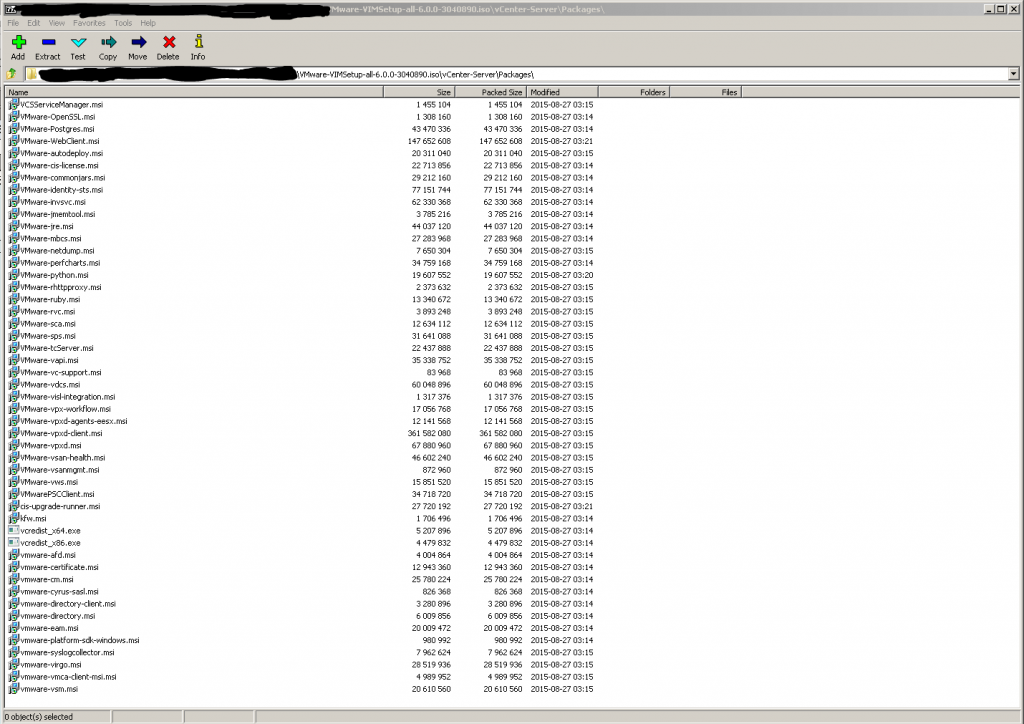
vCetnerDiskContent

Mounting the ISO and chaning with an administrative commandline to the above path is the easiest way to uninstall the file. Otherwise the DVD-content could also be extracted to any directory.

Zabbix interface status – Error reset procedure

Zabbix is quite cool, but there are still some minor problems which make life a littel bit harder (or just do not look too good).

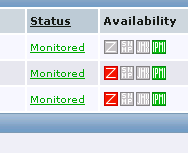
One of this little bugs it, that if you add the wrong interface to your host and try to query it (and an error is returend) – results in an red icon for the corresponding intrface in the hosts-overview.

zbx-if-error

The only way (I know) to reset those interface is to delete the host and create it new, or the easier way would be to clone the host and delte the old one. To be honest – I don’t like any of those two possiblities, so i decided to find another way.

As a matter of fact, the info is stored in the database so we could reset the icon in the DB:  herefor we need to log in to the database and find the correct table. I assume you know hot wo log in to your DB 😉
The table which stores the infor about the interfaces would be the “hosts”-table. Ths table contains a column called “available” which indicates the interface status. For the zabbix agent it’s just called available, for snmp, ipmi, jmx, you alway the the type as a prefix – so snmp: snmp_available. the column stores an integer from 0 to 3 with:
0=if not in use (gray)
1=if in use and everything is fine =green
2=if in use and an error occured=red
so by updating the DB-entry we could reset the icon-indicator for a specific host.

UPDATE hosts SET available=0 WHERE hostid=12345;

… would set the icon for the Agent to gray for the host 12345. The host-id could be obtained by hovering over the link to the host or opening the host and afertwards it’s displayed in the address bar.


VMware 6.0 vCenter Webclient blank section in the middle (blank middle frame) – VSAN Health Plugin

It seems that the VSAN Health Plugin could break the vCenter webclient if it’s not installed correctly. After installing the MSI-Packge on the Windows vCenter server and logging in via the web client everything seemed ok at the begining, but after selectin the datacenter, a cluster or a host/vm the middle section whoich sould display dietalled informatons about the selected property did not load and stayed blank.

After some searching I found an interssting VMware KB-article which described my problem. My vCenter looked like the screenshoot in the below article.

https://communities.vmware.com/thread/510468?start=0&tstart=0

It seems that I made the mistake and installed the VSAN health plugin as a domain admin – and that just does not work.  After uninstalling the plugin, restarting the vCenter, logging in as a local admin, starting a command prompt with admin priviliged and restarting the installation again, it woked fine.


BTW. in the new VSAN health plugin releases VMware fixed the DRS-dependency and now its possible to also install the plugin without activated DRS.  🙂

Before you had to install the Plugin while your system had the evaluation licens where you could activate DRS. If you use a license like  Essentials Plus + VSAN that could be a real problem.

VMware 6 ESXi Hardware Health States are not displayed (with Fujitsu CIM-Provider)

After setting up a ESXi-Cluster with VSAN based on VMware 6 the Fujitsu CIM-Providers did not provide any hardware health states and also the Fujitsu vCenter plugin did not provide any data. The service always timed out an no data where gathered. Instead the following error message was diplaed:

No new host data available. Data will be updated in 5 minutes

All that happened after updating the ESXi & FJ CIM providers with the VMware Update Manager.

After some investigation it seemed that the ESXi could not communicate with the CIM-Server. A restart of the CIM-Provider and clearing of the sensor-data and event-log seemed to fix the problem and the server was finaly able to gather data.

Install Zabbix on Raspberry PI 2

Wouldn’t it be cool to monitor your home? For example all your devices, but also temperature and other sensors an have all that data accessible via a web interfaces?

I think it would so, i thought about setting up Zabbix for home monitoring, but on the RaPi B and B+ it’s not the most performant setup, So i decided to try it again with the PI2.

This post provides a short log on how I set it up.

At first we have to download the source from Zabbix’ SF-page because there is no official package for the ARM-architecture available.

[pastacode lang=”bash” message=”zabbix installation” highlight=”” provider=”manual”]

cd /opt
wget http://downloads.sourceforge.net/project/zabbix/ZABBIX%20Latest%20Stable/2.4.6/zabbix-2.4.6.tar.gz?r=http%3A%2F%2Fwww.zabbix.com%2Fdownload.php&ts=1441447329&use_mirror=skylink^C
mv zabbix-2.4.6.tar.gz\?r\=http\:%2F%2Fwww.zabbix.com%2Fdownload.php zabbix-2.4.6.tar.gz
tar xfvz zabbix-2.4.6.tar.gz
cd zabbix-2.4.6/


#With ./configure --help we can see all the availalbe switches which can be used to compile zabbix.
root@raspberrypi /opt/zabbix-2.4.6 # groupadd zabbix
root@raspberrypi /opt/zabbix-2.4.6 # useradd -g zabbix zabbix
root@raspberrypi /opt/zabbix-2.4.6 # ./configure --help


#I used the follwoing switches to compile the zabbix server and agent, use a MySQL-DB, enable jabber-support, lib-xml2 - which is needed for webmonitoring, net-snmp, ssh and curl which is alos needed for webmonitoring. IPMI can be useful if you also hav a realy server with a BMC to monitor. But for most homeusers the IPMI-option is not neede if you only want to monitor your home and thats it. If you have a LDAP/AD-environment where you want to integrate zabbix you also should use the ldap-switch, but I think most home users also do not have a directory service running at home. ;)

#If this command is run there will ocure some erroes in most cases because there are missing dependencies

./configure --enable-server --enable-agent --with-mysql --with-jabber --with-libxml2 --with-net-snmp --with-ssh2 --with-libcurl


apt-get install apache2 php5-mysql mysql-server mysql-common mysql-utilities libiksemel-dev libiksemel-utils libxml2-dev libxml2-utils libxml2 snmp libsnmp-dev libsnmp-perl libssh2-1-dev libssh2-1 libcurl3 libghc-curl-dev libmysql++-dev php5-gd

#now all dependencies should be resolved
./configure --enable-server --enable-agent --with-mysql --with-jabber --with-libxml2 --with-net-snmp --with-ssh2 --with-libcurl

#copy init scripts
cp /opt/zabbix-2.4.6/misc/init.d/debian/* /etc/init.d/
#copy webfrontend
cp -r /opt/zabbix-2.4.6/frontends/php/* /var/www/zabbix/
chown -R www-data:www-data /var/www/zabbix/


#create the database
#at first log in to your mysql-server as a root useradd and runn the following commands
mysql -uroot -p
create database zabbix character set utf8 collate utf8_bin;
CREATE USER 'zabbix'@'localhost' IDENTIFIED BY 'zabbix';
GRANT ALL PRIVILEGES ON zabbix.* TO 'zabbix'@'%' WITH GRANT OPTION;
mysql -uzabbix -pzabbix zabbix < /opt/zabbix-2.4.6/database/mysql/schema.sql
mysql -uzabbix -pzabbix zabbix < /opt/zabbix-2.4.6/database/mysql/images.sql
mysql -uzabbix -pzabbix zabbix < /opt/zabbix-2.4.6/database/mysql/data.sql

#adapt configuration files at /usr/local/etc/ like in the attached examples
#create dircetories for logfiles:
mkdir -p /var/log/zabbix
chown -R zabbix:zabbix /var/log/zabbix/

#create dirs for alert & external scripts 
mkdir -p /var/zabbix/alertscripts
mkdir -p /var/zabbix/externalscripts
chown -R zabbix:zabbix /var/zabbix/


#configure php-settings
vim /etc/php5/apache2filter/php.init
post_max_size = 16M
max_execution_time = 300
max_input_time = 300
#select timezone from http://php.net/manual/en/timezones.php and set:
date.timezone = 

#restart/reload webserver to accept changes
service apache2 restart
service zabbix-server restart
service zabbix-agent restart

#open http:///zabbix in browser and finish installation


[/pastacode]


zabbix-conf

Basic mail configuration for webserver and mailforwarding for root

Till now I didn’t configured any mail support for wordpress but today I wanted to enable wordpress to send mails to me and became aware that I didn’t configure postfix for my system.

In fact a basic configuration is quite easy. If the webserver should be able to send mails to an address of your choice you may hav to adapt the follwoing parameters in the /etc/postfix/main.cf:

myhostname = vps.fawcs.info
mydomain = fawcs.info
myorigin = $mydomain

After those three parameters are configured the postfix service has to be restarted: systemctl restart postfix.service

If there are still no mails comming in check if the /etc/php.ini is configured to use sendmail_path = /usr/sbin/sendmail -t -i

I also recogized that there are some mail in the inbox for the root user so I decided to also enable mail fowarding to get new mails directly to my mail-address instead of the root’s inbox.

Herfore the last line in /etc/aliases has to be uncommented to look like:
# Person who should get root’s mail
root: yourmail@yourdomain.info

Afterwards the postfix service has to be restarted once again and in the future all mails will be forwareded to the system.

if you have troubles receiving mails the mailq command is helpful to debug problems with unsent mails or mails which get rejected by the receiving mail server. A look at the /var/log/maillog logfile is also worth a try. 😉


Display php-errors

Mostly the following PHP.ini settings are enough to make php display errors in a production environement where error_reporting & display_errors are disabled in the PHP.ini.

[pastacode lang=”php” message=”” highlight=”” provider=”manual”]

ini_set('display_startup_errors', 'On');
ini_set('display_errors', 'On');
ini_set('html_errors ', 'On');
ini_set('log_errors  ', 'On');
ini_set('error_reporting', 'E_ALL & ~E_NOTICE');
error_reporting(E_ALL);

[/pastacode]

But in some cases there will not be an error message displayed. The only solution I found was to enable the dispaly_errors in the php.ini.
To avoid setting this aparameter globally it could also be set in the conf-file for the virtual host which worked for me pritty fine.

[pastacode lang=”apacheconf” message=”” highlight=”” provider=”manual”]

:>
        ...
        php_value display_errors On
        ...

[/pastacode]


Webserver certificate -creation script

Today I got some time to take care of my server so i installed the latest updates checkt the system for attacks and when I checkt my SSL-certificates i found out, that they were just valid till April 2015 … UPS … ok they are not officially signed and i just use them to encrypt sensitive communication with my server but i wanted to fix that issue and some other little issues i found when checking my blog with https://www.ssllabs.com/ssltest/analyze.html?d=blog.fawcs.info.

Because I also had to regenerate the certificates for my other subdomains I wrote a little script to do that for me (and to use it in the future, because I always have to look up the SSL-certificat generation)


So here is the script:

[pastacode lang=”bash” message=”SSL cert-generation” highlight=”” provider=”manual”]

#!/bin/bash

if [ -z $1 ];
then
        echo "Parameter 1 for Domain is missing";
        exit;
fi

openssl genrsa -out $1.key 2048
openssl req -x509 -new -nodes -key $1.key -days 1024 -out $1.crt -subj "/C=AT/ST=Vienna/L=Vienna/O=fawCS.info/CN=$1"

[/pastacode]


I also updated the security settings in my virtual host configuration files for some settings. The DH-KeyExchange cipher got excluded from the available ciphers because there is a new attack against DH which makes it vulnerable to MITM-attacks.
http://www.heise.de/security/meldung/Logjam-Attacke-Verschluesselung-von-zehntausenden-Servern-gefaehrdet-2657502.html [German]

Extract of settings:

TraceEnable off
ServerSignature Off
ServerTokens Prod
SSLProtocol all -SSLv2 -SSLv3
SSLHonorCipherOrder on
SSLCipherSuite “EECDH+ECDSA+AESGCM EECDH+aRSA+AESGCM EECDH+ECDSA+SHA384 EECDH+ECDSA+SHA256 EECDH+aRSA+SHA384 EECDH+aRSA+SHA256 EECDH+aRSA+RC4 EECDH !EDH+aRSA !RC4 !aNULL !eNULL !LOW !3DES !MD5 !EXP !PSK !SRP !DSS”

And it’s always a good idea to to use htaccess with extra users or IP-ACLs to secure specific directories. (for example the wp-admin directory 🙂 )

Some other interesting settings to macke apache more secure can be found her: http://www.tecmint.com/apache-security-tips/

RHEL 6- loop devices

If you need to mount a lot of ISOs on a system than you could run into the problem, that you do not have free loop devices left.
There are several solutions from running “MAKEDEV -v /dev/loop” at boot time (e.g. add it to rc.local) to creating a file called loop.conf at /etc/modprobe.d/ and inserting the follwoing line:

[pastacode lang=”bash” message=”” highlight=”” provider=”manual”]

[/pastacode]

At the end the following parameter has to be added to the Grub-config file:

max_loop=128

[pastacode lang=”bash” message=”” highlight=”” provider=”manual”]

# grub.conf generated by anaconda
#
# Note that you do not have to rerun grub after making changes to this file
# NOTICE:  You have a /boot partition.  This means that
#          all kernel and initrd paths are relative to /boot/, eg.
#          root (hd0,0)
#          kernel /vmlinuz-version ro root=/dev/mapper/vg1-root
#          initrd /initrd-[generic-]version.img
#boot=/dev/sda
default=0
timeout=5
splashimage=(hd0,0)/grub/splash.xpm.gz
hiddenmenu
password --encrypted ******************************************************************
title Red Hat Enterprise Linux 6 (2.6.32-504.el6.x86_64)
        root (hd0,0)
        kernel /vmlinuz-2.6.32-504.el6.x86_64 ro root=/dev/mapper/vg1-root rd_NO_LUKS LANG=en_US.UTF-8  KEYBOARDTYPE=pc KEYTABLE=de-latin1-nodeadkeys rd_NO_MD rd_LVM_LV=vg1/root SYSFONT=latarcyrheb-sun16 rd_LVM_LV=vg1/swap crashkernel=auto rd_NO_DM max_loop=128
        initrd /initramfs-2.6.32-504.el6.x86_64.img

[/pastacode]

instead of makedev (which creates 264 loop devices) the following snipped can be used:


[pastacode lang=”bash” message=”” highlight=”” provider=”manual”]

mknod -m640  /dev/loop8  b 7  8
mknod -m640  /dev/loop9 b 7  9
mknod -m640  /dev/loop10 b 7  10
mknod -m640  /dev/loop11 b 7  11
mknod -m640  /dev/loop12 b 7  12
mknod -m640 /dev/loop13 b 7 13
mknod -m640 /dev/loop14 b 7 14
mknod -m640 /dev/loop15 b 7 15
mknod -m640 /dev/loop16 b 7 16
mknod -m640 /dev/loop17 b 7 17
mknod -m640 /dev/loop18 b 7 18
mknod -m640 /dev/loop19 b 7 19
mknod -m640 /dev/loop20 b 7 20
mknod -m640 /dev/loop21 b 7 21
mknod -m640 /dev/loop22 b 7 22
mknod -m640 /dev/loop23 b 7 23
mknod -m640 /dev/loop24 b 7 24
mknod -m640 /dev/loop25 b 7 25
mknod -m640 /dev/loop26 b 7 26
mknod -m640 /dev/loop27 b 7 27
mknod -m640 /dev/loop28 b 7 28
mknod -m640 /dev/loop29 b 7 29
mknod -m640 /dev/loop30 b 7 30
mknod -m640 /dev/loop31 b 7 31
mknod -m640 /dev/loop32 b 7 32
mknod -m640 /dev/loop33 b 7 33
mknod -m640 /dev/loop34 b 7 34
mknod -m640 /dev/loop35 b 7 35
mknod -m640 /dev/loop36 b 7 36
mknod -m640 /dev/loop37 b 7 37
mknod -m640 /dev/loop38 b 7 38
mknod -m640 /dev/loop39 b 7 39
mknod -m640 /dev/loop40 b 7 40
mknod -m640 /dev/loop41 b 7 41
mknod -m640 /dev/loop42 b 7 42
mknod -m640 /dev/loop43 b 7 43
mknod -m640 /dev/loop44 b 7 44
mknod -m640 /dev/loop45 b 7 45
mknod -m640 /dev/loop46 b 7 46
mknod -m640 /dev/loop47 b 7 47
mknod -m640 /dev/loop48 b 7 48
mknod -m640 /dev/loop49 b 7 49
mknod -m640 /dev/loop50 b 7 50
mknod -m640 /dev/loop51 b 7 51
mknod -m640 /dev/loop52 b 7 52
mknod -m640 /dev/loop53 b 7 53
mknod -m640 /dev/loop54 b 7 54
mknod -m640 /dev/loop55 b 7 55
mknod -m640 /dev/loop56 b 7 56
mknod -m640 /dev/loop57 b 7 57
mknod -m640 /dev/loop58 b 7 58
mknod -m640 /dev/loop59 b 7 59
mknod -m640 /dev/loop60 b 7 60
mknod -m640 /dev/loop61 b 7 61
mknod -m640 /dev/loop62 b 7 62
mknod -m640 /dev/loop63 b 7 63
mknod -m640 /dev/loop64 b 7 64
chown root:disk /dev/loop*

[/pastacode]