Category Archives: Tools

WSUS Server unable to obtain updates

If a WSUS server fails to obtain updates with the following error: “wsus the request failed with http status 404 not found” this might be because it still uses an old/outdated URL (https://fe2.update.microsoft.com/v6) to obtain the updates from.

This can be checked and changed with the following PS1 Snippet:

$server = Get-WsusServer
$config = $server.GetConfiguration()
# Check current settings before you change them 
$config.MUUrl
$config.RedirectorChangeNumber
# Update the settings if MUUrl is https://fe2.update.microsoft.com/v6
$config.MUUrl = "https://sws.update.microsoft.com"
$config.RedirectorChangeNumber = 4002
$config.Save()
iisreset
Restart-Service *Wsus* -v

Simply check if login on an ESXi works and return it’s license

Just a simple script to test ESXi Connectivity and return the current license state of the server by using PowerCLI

param(
    [Parameter(Mandatory = $true, HelpMessage = 'Provide username for login on ESXi')]
    [String] $username,
    [Parameter(Mandatory = $true, HelpMessage = 'Provide password for login on ESXi', ParameterSetName = 'Secret')]
    [Security.SecureString] $password

)

#check user/pwd
if($username -like "" -Or $password -like "")
{
    Write-Host -ForegroundColor Red "Username/Password seems wrong"
    exit(1)
}

#define domain
$domain="forensik.justiz.gv.at"

#disable certificate checking as we have self signed certs
Set-PowerCLIConfiguration -InvalidCertificateAction Ignore -Confirm:$false

$hosts="SITE01-ESX01","SITE01-ESX02","SITE01-ESX03","SITE01-ESX04","SITE01-ESX05","SITE01-ESX06","SITE02-ESX01","SITE02-ESX02","SITE02-ESX03","SITE02-ESX04","SITE02-ESX05","SITE02-ESX06" 


foreach($var_host in $hosts)
{
    Write-Host -ForegroundColor Yellow $var_host"."$domain
    Connect-VIServer -Server $var_host"."$domain -User $username -Password ([Runtime.InteropServices.Marshal]::PtrToStringAuto([Runtime.InteropServices.Marshal]::SecureStringToBSTR($password)))
    $(Get-VMHost).Name
    $(Get-VMHost).Version
    $(Get-VMHost).LicenseKey
    $(Get-VMHost).Uid
    Disconnect-VIServer $var_host"."$domain -WarningAction SilentlyContinue -Confirm:$false
    Write-Host -ForegroundColor Cyan "~~~~~~~~~~~~~~~~~~~~~~~~~~~~~~~~~~~~~~~~~~~~~~~~~~~~~~~~~~~~~~~~~~~"
}

Bash – Monitor directory size for change

A simple bash-script to easily monitor if a directory has grown or shrunk in size:

while [ 1 ]; do result=$(du -s * | egrep "bitcoin-0.21.1$"); echo -e "\e[95m$result\e[0m"; curSize=$(echo $result | cut -d" " -f1); if [ $curSize -lt $oldSize ]; then echo -e
 "\e[92mShrunk: $curSize\e[0m"; else echo -e "\e[91mGrown: $curSize\e[0m"; fi; oldSize=$curSize; sleep 5; done

Script needs to be executed in the parrent directory of the monitored dir and directory name must be adapted: bitcoin-0.21.1$ -> to whatever you want to grep for

Start PS-Admin session from an unprivileged user

 runas  /user:administrator 'powershell -command Start-Process powershell -verb runas' 

PowerCLI batch revert to Snapshot

The following script-let can be used to revert a bunch of VMs/all VMs in a folder back to the first snapshot made for the VM

$vms = Get-Folder "MY_VM_FOLDER_NAME" | Get-VM
 
foreach($vm in $vms)
{
    $vm.name
    $snap = Get-Snapshot -VM $vm | Sort-Object -Property Created -Descending | Select -First 1
    Set-VM -VM $vm -SnapShot $snap -Confirm:$false
    echo "~~~~~~~~~~~~~~~~~~~~~~~~~~~~~~~~~~~~~~~~"
}

Get CVE information from NIST NVD and RHEL

Just two littel scripts that come handy if you want to download all the CVE info in JSON format for offline use.

[pastacode lang=”bash” manual=”%23!%2Fbin%2Fbash%0Aurls%3D%24(curl%20https%3A%2F%2Fnvd.nist.gov%2Fvuln%2Fdata-feeds%23JSON_FEED%20%7C%20grep%20’https%3A%2F%2F’%20%7C%20grep%20-i%20json.gz%20%7C%20sed%20’s%2F.*href%3D%2F%2Fg’%20%7C%20cut%20-d%5C’%20%20-f2)%0A%0Amkdir%20-p%20.%2FnistNvdJson%0Acd%20nistNvdJson%0Afor%20l%20in%20%24urls%3B%0Ado%0Awget%20%24l%0Adone%0Agunzip%20*%0A” message=”Donwload NIST NVD CVEs in JSON” highlight=”” provider=”manual”/]


[pastacode lang=”bash” manual=”%23!%2Fbin%2Fbash%0A%0A%0AloopVar%3D1%0AdataDir%3D%22rhelCveData%22%0Amkdir%20%24dataDir%20-p%0Aecho%20%22getting%20data%3A%22%0AT%3D%22%24(date%20%2B%25s)%22%0Awhile%20%5B%5B%20%24loopVar%20-ne%200%20%5D%5D%3B%0Ado%0A%20%20%20%20%20%20%20%20echo%20-n%20%22-%24loopVar-%20%22%0A%20%20%20%20%20%20%20%20data%3D%24(curl%20-s%20https%3A%2F%2Faccess.redhat.com%2Flabs%2Fsecuritydataapi%2Fcve.json%3Fpage%3D%24loopVar)%0A%20%20%20%20%20%20%20%20if%20%5B%5B%20%22%24data%22%20%3D%3D%20%22%5B%5D%22%20%5D%5D%3B%20then%0A%20%20%20%20%20%20%20%20%20%20%20%20%20%20%20%20loopVar%3D0%0A%20%20%20%20%20%20%20%20else%0A%20%20%20%20%20%20%20%20%20%20%20%20%20%20%20%20toFile%3D%24toFile%24%7Bdata%3A1%3A-1%7D%22%2C%20%22%0A%20%20%20%20%20%20%20%20%20%20%20%20%20%20%20%20let%20loopVar%3DloopVar%2B1%0A%20%20%20%20%20%20%20%20fi%0Adone%0AT%3D%22%24((%24(date%20%2B%25s)-T))%22%0Aecho%20%22%5B%24%7BtoFile%3A%3A-2%7D%5D%22%20%3E%3E%20%22%24dataDir%2FrhelCve.json%22%0Ased%20-i%20’s%2F%5E%5C%5B%5C%5D%24%2F%2Fg’%20%22%24dataDir%2FrhelCve.json%22%0Aprintf%20%22Got%20data%20in%3A%20%2502dd%3A%2502dh%3A%2502dm%3A%2502ds%5Cn%22%20%22%24((T%2F86400))%22%20%22%24((T%2F3600%2524))%22%20%22%24((T%2F60%2560))%22%20%22%24((T%2560))%22%0A” message=”Get CVE infos for RHEL” highlight=”” provider=”manual”/]


Additional information:
If you query the NIST NVD Data and search for RHEL CPEs you won’t get a lot of hits as only a smal percentage of the CVEs that affect Red Hat software has the correct CPE attached. However – NIST NVD is nice to have because in the Red Hat CVEs only the total CVSS score is listed but no detailed vulnerability metrics are included.

Windwos telephone activiation – shortcut

When using the telephone activiation select the option that MS sends you a link to an activation page. http://md.vivr.io/XxX0c0C Use the link and the following commands on the computer to extracte the activaition ID from the system, paste it on the webinterface and copy the confirmation ID back to the system. To paste the activiation ID on the Microsoft Website use the cscript command to print the ID to the command prompt, copy it to Keepass in the autotype field and use the autotype option to paste the blocks. To strip the response NPP + the follwoing regex can be used: [A-Z]|\t|\n -> Strips all upper case characters, tabstops and CRs


Tools Needed:

  • KeePass (or any other autotype tool)
  • Notepad++
    NPP-Regex for search and replace: [A-Z]|\t|\n


Commands:

#Install Productkey
slmgr /ipk <ProductKey>

#Display activation ID
cscript C:\Windows\System32\slmgr.vbs /dti

From <https://social.technet.microsoft.com/Forums/windows/de-DE/3ead2d77-00fc-4c06-b4c0-82eae0ebc2bc/save-slmgr-dli-output-to-text-file?forum=w7itproinstall>

#install confirmation ID from Microsoft
slmgr /atp <Confirmation ID>

#Check Status
slmgr /dlv

OR
slmgr /dli

From <http://www.thewindowsclub.com/view-licensing-status-activation-id-windows-slmg

Flashing NextThing C.H.I.P. with a Raspberry Pi

Today I somehow bricked my CHIP (I think it wasn’t the wised idea to set the system-target to network_online) as I didn’t get access via serial connection or ssh.
It wasn’t that much of a problem as I wanted to set up the CHIP as a headless system.
So the journey begins (http://docs.getchip.com/chip.html#installing-c-h-i-p-sdk) with setting up Virtual Box + Extension pack and installing vagrant on my Windows 10 (Git was already installed).

After everything was installed I started the VM wich was setup by vagrant and ran the chip-update-firmware.sh script to start the upgrade, but it failed with “Waiting for fel……………………………TIMEOUT”.
The reason was, that regardless of the USB-rules in the Vagrantfile, the CHIP was not available in the VM. Easy to check with “lsusb”. No Big deal – As the VM is available in the VirtualBox Manager we can boot it up from there and just attach the CHIP-USB-Device to the VM.

waiting for fel…OK -> 🙂
BUT:
waiting for fastboot……………………………TIMEOUT
-> 🙁

So, it seems that after the reboot of the CHIP windows is not recognizing it the right way and also has some problems to pass it through to the VM.

I dind’t find a fix for that problem, but reportedly a physical Ubuntu installation should would (regarding to some forum post on the NextThing BBS). Too bad I only have Fedora on a laptop, but no Ubuntu – but I had a Raspberry which i was currently not using, so I gave it a try and it worked out quite nice.

I used a “Jessy lite” and installed the following packages:

[pastacode lang=”bash” manual=”sudo%20apt-get%20install%20android-tools-fastboot%C2%A0u-boot-tools%20u-boot%20cbootimage%C2%A0uuid-dev%20libacl1-dev%20liblzo2-dev%C2%A0libusb-1.0-0-dev%20libusb%2B%2B-dev%20libusb-1.0-0%20libusb-dev%20git%0Agit%20clone%20https%3A%2F%2Fgithub.com%2FNextThingCo%2FCHIP-SDK%0Acd%C2%A0CHIP-SDK%0Asudo%20.%2Fsetup_ubuntu1404.sh%0Acd%C2%A0CHIP-Tools%0Asudo%20.%2Fchip-legacy-update.sh%20-f%20-s” message=”Install packages and flash the CHIP” highlight=”” provider=”manual”/]
(I don’t think that all the packages are needed, but i got some errors and hence installed everything I thought fix those errors)
After that & a reboot of my CHIP i was able to access it again with:

screen /dev/ttyACM0 115200


Zabbix – Clear hosts from untemplated items

Sometimes you run into the problem, that you have a host which had a template attached but somebody wanted to replace the template or something like that and unfortunately hit just “Unlink” instead of “Unlink and Clear” and all the items are still in the host.

If you have only one host it’s normaly no problem to delete all items per hand, but if you have multiple of those hosts it’s quite some work do remove the old items.

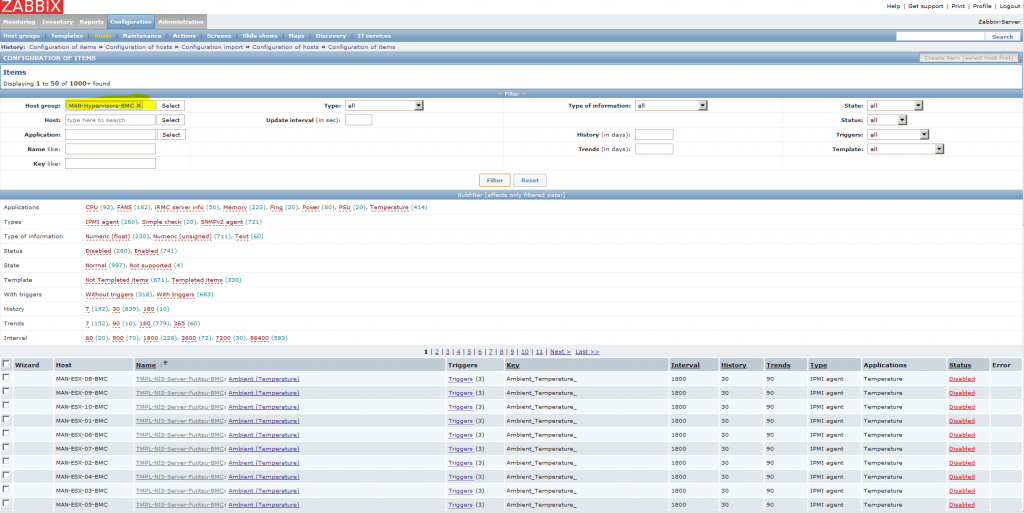
Solution nr. one would be tu use the filters to select all items in a specified host group and delte those items, but the applications, discovery rules and so on will still remain in the hosts and have to be deleted in a 2nd/3rd step.

See the Screenshot below:Zabbix Host configuration - item filters


My preferred solution for this problem is a simple regex based find/replace with Notepad++.
Herefor an export of the affected hosts is needed. The xml-file could be opend with NPP and the following regexes are needed for find/replace (CTRL+H) to remove the unwanted items.

[pastacode lang=”markdown” manual=”Find%20what%3A%20(%3Cdiscovery_rules%3E%5B%5Cs%5CS%5D*%3F%3C%5C%2Fdiscovery_rules%3E)%7C(%3Ctriggers%3E%5B%5Cs%5CS%5D*%3F%3C%5C%2Ftriggers%3E)%7C(%3Cinventory%3E%5B%5Cs%5CS%5D*%3F%3C%5C%2Finventory%3E)%7C(%3Citems%3E%5B%5Cs%5CS%5D*%3F%3C%5C%2Fitems%3E)%0A%0AReplace%20with%3A%20(%3F1%3Cdiscovery_rules%20%2F%3E)(%3F2%3Ctriggers%20%2F%3E)(%3F3%3Cinventory%20%2F%3E)(%3F4%3Citems%20%2F%3E)” message=”” highlight=”” provider=”manual”/]

In the above example multiple regexes with multiple replace-patterns are used to replace the items, discovery rules, triggers an inventory and reset it.

Cisco Deployment Guide

Today I received an useful link regarding Cisco L2 Access Switch-deployments with some interesting settings I wasn’t aware of till know.
The document is available via the following Link.

http://www.cisco.com/c/dam/en/us/td/docs/solutions/CVD/Oct2015/CVD-Campus_LAN_L2_Access_Simplified_Dist_Deployment-Oct2015.pdf