Powershell/PowerCLI very slow execution Time

Sometimes a PowerCLI-script can take quite some time till everything is executed. For example the PowerShell scripts used by Zabbix to gather the vCenter alarms into Zabbix (BlogPost) need some tuning to run fine.

So why are scripts running slow in some cases?
It seems to occur primary on systems which do not have a connection to the internet. As a matter of fact – most of the systems I’m setting up “lose” internet connection sooner, or later. :/

What exactly causes the problem?
While investigating that problem i found an interesting feature which seems to cause the problem – certificate checks!
There is an IE-setting which is named “Check for publisher’s certificate revocation ” and can be found at: Intenet Options -> Advanced -> Section: Security ->Disable: Check for publisher’s certificate revocation.

Disabling the certificate checks improves the execution time by about 60%.

certificate-check enabled:

Days              : 0
Hours             : 0
Minutes           : 0
Seconds           : 41
Milliseconds      : 536
Ticks             : 415369143
TotalDays         : 0.000480751322916667
TotalHours        : 0.01153803175
TotalMinutes      : 0.692281905
TotalSeconds      : 41.5369143
TotalMilliseconds : 41536.9143


certificate-check disabled:

Days : 0
Hours : 0
Minutes : 0
Seconds : 16
Milliseconds : 262
Ticks : 162628208
TotalDays : 0.000188227092592593
TotalHours : 0.00451745022222222
TotalMinutes : 0.271047013333333
TotalSeconds : 16.2628208
TotalMilliseconds : 16262.8208


If the script is run from a normal user account everything should be fine and we have an improved execution time, BUT …

… if the script is run from an Service (and as a matter of fact I’m using the Zabbix agent service to run the script) we got a problem.
With default settings the Zabbix Agent is installed to run as nt authority\system, so if the IE-setting is changed for the current user, its working for this user, but not for the system user. 🙁
So a quick and dirty workaround could be to disable the setting for the system user.
ATTENTION: Running the Zabbix Agent as a system user is OK for a DEV-environment, but should not be used in an production environment. For production a dedicated service user should be used.

I disabled it by becoming a system user with

[pastacode lang=”bash” message=”” highlight=”” provider=”manual”]

PSEXEC -i -s -d CMD

[/pastacode]

and launching the IE from the command prompt. Afterwards I was able to disable the setting via the above method.

Otherwise the Key could also be found in the registry at:

HKEY_CURRENT_USER\Software\Microsoft\Windows\CurrentVersion\WinTrust\Trust Providers\Software Publishing\State
0x00023e00 / 146944 Check OFF
0x00023c00 / 146432 Check ON

A simple PS-Script to disable the setting would be:

[pastacode lang=”bash” message=”PowerShell to disable Publisher certificate checks” highlight=”” provider=”manual”]

Write-Host "Disable Check for publisher’s certificate Revocation"
set-ItemProperty -path "REGISTRY::\HKEY_CURRENT_USER\Software\Microsoft\Windows\CurrentVersion\WinTrust\Trust Providers\Software Publishing\" -name State -value 146944

[/pastacode]


Get vCenter alarms into Zabbix via poll-method

Some time ago i wrote a post on how to forward vCenter alarms to Zabbix ( https://blog.fawcs.info/2015/05/getting-vcenter-alarms-to-zabbix/) and I have to admit, that this solutions is kind of a pain in the ass. I’m getting the alarm info from environmental varaibles which are automatically set by the vCenter when an alarm changes its status, but it seems that there is a “littel” problem with “overlapping” alarms. For example if there are occuring multiple alarms within a short period only the first alarm will be forwarded to zabbix, but non of the follwoing alarms. Besides that this is not an ideal solution I personally do not like my former approach because it’s an event driven approach. So if one event goes missing we have an inconsistent system :/

It’s quite some time since I wanted to redesign the solution and now I’m finally having some time ( and the pressure) to do so. 🙂
The new approach is based on using userparameters to execute a powershellscript on the vCenter to discover all active alarms and create items in Zabbix. At the moment I’m creating three item prototyes. One for the Timestamp when the alarm became active, another item for the acknowledged-state of the alarm and the last one for the severity of the alarm.

There are two userparemeters which run two powershell scripts. The first one (vcenter.alarm.polling.discovery.ps1) does the discovery and the second one (vcenter.alarm.polling.itemdata.ps1) is to get the data for the discoverd items.
There are also three triggers (one for each severity gray, yellow, red) which will be active als long as the alarm is not acknowledged.

You can download the scripts, userparameters and the template down below:
vCenterAlarmPolling


Additional findings:
Ther can occure problems if there are different addresses used to connect to the vcenter (eg. 127.0.0.1, loclahost, vcenterhostname, …)
It seems that the vCenter creates a sperate datacenter instance for every connection, so if you use the three examples from abovve you will end up creating three instances and mess up the script.


If special characters want to be passed to the powershellscript (e.g. special chars in passwords ord login with administrator@vsphere.local) the “UnsafeUserParameters=1” – parameter from the zabbix-agent.conf needs to be set to 1. (default value is 0)

Cisco Deployment Guide

Today I received an useful link regarding Cisco L2 Access Switch-deployments with some interesting settings I wasn’t aware of till know.
The document is available via the following Link.

http://www.cisco.com/c/dam/en/us/td/docs/solutions/CVD/Oct2015/CVD-Campus_LAN_L2_Access_Simplified_Dist_Deployment-Oct2015.pdf

VMware RVC not working after Update – Error 193: %1 is not a valid Win32 application

Today I once again upgraded a vCenter installation and afterwards I wanted to use the RVC, but I always got the following error when trying to open the RVC:

C:/Program Files/VMware/vCenter Server/ruby/lib/ruby/2.1.0/rubygems/core_ext/kernel_require.rb:55:in `require’: 193: %1 is not a valid Win32 application. – C:/Program Files/VMware/vCenter Server/ruby/lib/ruby/2.1.0/x64-mingw32/zlib.so (LoadError)
…..

So … hm … fubar. It seems that there still remain some old files on the FS when upgrading and those old files seem to cause some trouble.

To fix the problem you could try to uninstall just the vmware-ruby.msi and vmware-rvc.msi (I uninstalled both, maybe it’s enough to uninstall only the rvc-package) and reinstall. After uninstalling the file there will still be an folder rvc at “C:\Program Files\VMware\vCenter Server” – rename it before reinstallling the MSI-packages to get a clean installation!
Attention – VMware passes some parameters to the MSI-files . If you just doubleclick on the files, they will get installed, but not under:
C:\Program Files\VMware\vCenter Server

I used the parameters from the upgrade which were:

F:\vCenter-Server\Packages>msiexec /i VMware-ruby.msi ALLUSERS=1 ARPSYSTEMCOMPON
ENT=1 INSTALLPATH=”C:\Program Files\VMware\vCenter Server\” APPDATAPATH=”C:\Prog
ramData\VMware\vCenterServer\”

F:\vCenter-Server\Packages>msiexec /i VMware-rvc.msi ALLUSERS=1 ARPSYSTEMCOMPONE
NT=1 INSTALLPATH=”C:\Program Files\VMware\vCenter Server\” APPDATAPATH=”C:\Progr
amData\VMware\vCenterServer\”

Putty – Terminal “halts/freezes” after CTRL+S

Did you ever work with vi/nano (whatever)  and wanted to save a file?
If you are not that hardcore a linux person who does everything on a terminal and also works with Windows, you know that it is always a good idea to press CTRL+S once in a while to save your progress.

I press this shortcut automatically and it even happens to me while working on a putty session, which results in a “freezed” terminal session.
The reason for this behavior is that ctrl+s sends “XOFF” and putty stopps displaying any output, but still accepts keystrokes.

But its also easy to disable XOFF again – just press CTRL+Q and putty will continue to show your output on the screen. 🙂

VMware JRE update fails

While I was trying to update a VMware vCenter 6 to 6u1 today I had the problem, that the upgrade failed permanently, because of the following error:
Installation of component VMware JRE standalone installer failed with error code ‘3010’. Check the logs for more details.


Searching on the net did not bring up any results regarding this error, so I had to debug it myself. I tried to call the vmware-jre.msi directly from the DVD-ISO, and at first it seemd to run through, but, after some minutes of waiting, the MSI opened a pop up and asked for the installation-CD for vmware-jre.msi. It seemd that the new MSI wanted to uninstall the old msi-package and when trying to uninstall the old package the problem with the installation-media-dialoge popped up.

Trying to install the old version from the already installed vCenter also ended up in asking for an installation media.

At the end I started an administrative cmd-window and ran “msiexec /uninstall vmware-jre.msi” which uninstalled the old JRE and afterwards an update-process of the vCenter was possible.

Dump from the Error-Log:


[pastacode lang=”bash” message=”VMware JRE – Installation – Error log” highlight=”” provider=”manual”]

Stage: install stage: install-packages / vmware-jre.msi
2015-12-17 13:53:07.820Z| vcsInstUtil-3018519| I: LaunchPkgMgr: Telling child to install "X:\vCenter-Server\Packages\vmware-jre.msi" with "INSTALLPATH="C:\Program Files\VMware\vCenter Server\" VM_UPDATE=1" details 0
2015-12-17 13:53:07.820Z| vcsInstUtil-3018519| I: wWinMain: Exe is told to run "X:\vCenter-Server\Packages\vmware-jre.msi" with "INSTALLPATH="C:\Program Files\VMware\vCenter Server\" VM_UPDATE=1" details 0
2015-12-17 13:53:18.882Z| vcsInstUtil-3018519| E: wWinMain: MSI result of install of "X:\vCenter-Server\Packages\vmware-jre.msi" may have failed: 3010 (0x00000bc2)
2015-12-17 13:53:18.882Z| vcsInstUtil-3018519| E: LaunchPkgMgr: Operation on vmware-jre.msi appears to have failed: 3010 (0x00000bc2)
2015-12-17 13:53:18.882Z| vcsInstUtil-3018519| I: PitCA_MessageBox: Displaying message: "Installation of component VMware JRE standalone installer failed with error code '3010'. Check the logs for more details."
2015-12-17 13:59:25.191Z| vcsInstUtil-3018519| I: LaunchPkgMgr: Telling child to revert transaction

[/pastacode]

UPDATE:
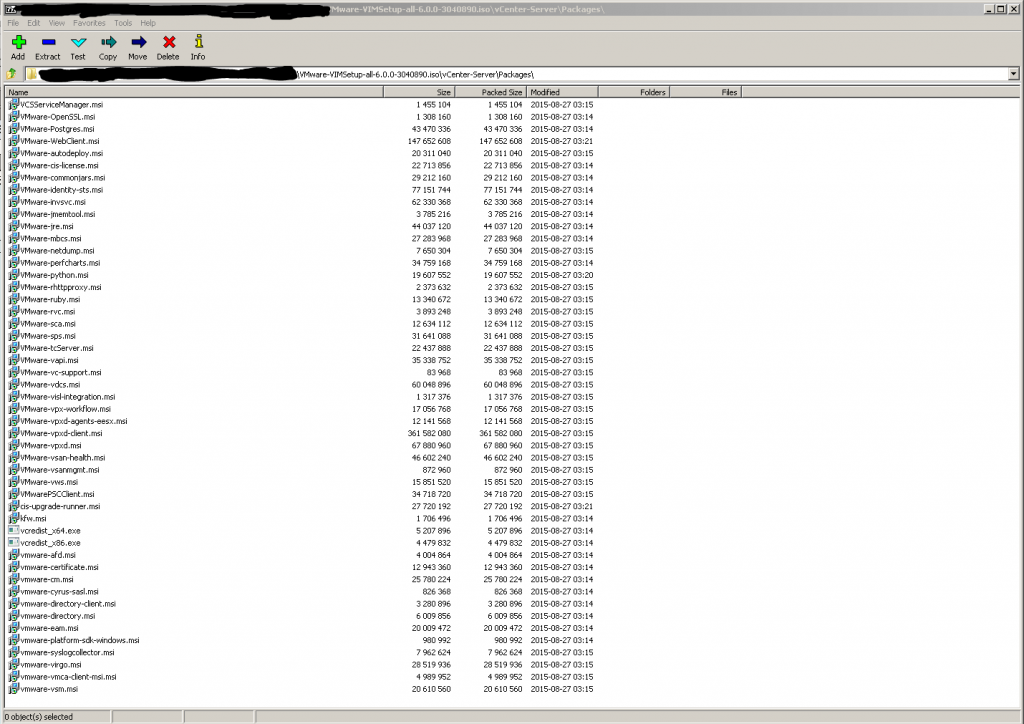
The MSI-packages are located on the vCenter installation disk. The iso can be downloaded from: https://my.vmware.com/web/vmware/details?productId=491&downloadGroup=VC600U1 (VMware Account needed)
Once the ISO is downloaded it can be mounted/opened (eg. 7zip) and the MSI-Packages are located at: \vCenter-Server\Packages\

vCetnerDiskContent

Mounting the ISO and chaning with an administrative commandline to the above path is the easiest way to uninstall the file. Otherwise the DVD-content could also be extracted to any directory.

Zabbix interface status – Error reset procedure

Zabbix is quite cool, but there are still some minor problems which make life a littel bit harder (or just do not look too good).

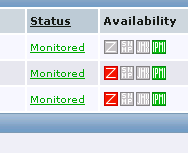
One of this little bugs it, that if you add the wrong interface to your host and try to query it (and an error is returend) – results in an red icon for the corresponding intrface in the hosts-overview.

zbx-if-error

The only way (I know) to reset those interface is to delete the host and create it new, or the easier way would be to clone the host and delte the old one. To be honest – I don’t like any of those two possiblities, so i decided to find another way.

As a matter of fact, the info is stored in the database so we could reset the icon in the DB:  herefor we need to log in to the database and find the correct table. I assume you know hot wo log in to your DB 😉
The table which stores the infor about the interfaces would be the “hosts”-table. Ths table contains a column called “available” which indicates the interface status. For the zabbix agent it’s just called available, for snmp, ipmi, jmx, you alway the the type as a prefix – so snmp: snmp_available. the column stores an integer from 0 to 3 with:
0=if not in use (gray)
1=if in use and everything is fine =green
2=if in use and an error occured=red
so by updating the DB-entry we could reset the icon-indicator for a specific host.

UPDATE hosts SET available=0 WHERE hostid=12345;

… would set the icon for the Agent to gray for the host 12345. The host-id could be obtained by hovering over the link to the host or opening the host and afertwards it’s displayed in the address bar.


VMware 6.0 vCenter Webclient blank section in the middle (blank middle frame) – VSAN Health Plugin

It seems that the VSAN Health Plugin could break the vCenter webclient if it’s not installed correctly. After installing the MSI-Packge on the Windows vCenter server and logging in via the web client everything seemed ok at the begining, but after selectin the datacenter, a cluster or a host/vm the middle section whoich sould display dietalled informatons about the selected property did not load and stayed blank.

After some searching I found an interssting VMware KB-article which described my problem. My vCenter looked like the screenshoot in the below article.

https://communities.vmware.com/thread/510468?start=0&tstart=0

It seems that I made the mistake and installed the VSAN health plugin as a domain admin – and that just does not work.  After uninstalling the plugin, restarting the vCenter, logging in as a local admin, starting a command prompt with admin priviliged and restarting the installation again, it woked fine.


BTW. in the new VSAN health plugin releases VMware fixed the DRS-dependency and now its possible to also install the plugin without activated DRS.  🙂

Before you had to install the Plugin while your system had the evaluation licens where you could activate DRS. If you use a license like  Essentials Plus + VSAN that could be a real problem.

VMware 6 ESXi Hardware Health States are not displayed (with Fujitsu CIM-Provider)

After setting up a ESXi-Cluster with VSAN based on VMware 6 the Fujitsu CIM-Providers did not provide any hardware health states and also the Fujitsu vCenter plugin did not provide any data. The service always timed out an no data where gathered. Instead the following error message was diplaed:

No new host data available. Data will be updated in 5 minutes

All that happened after updating the ESXi & FJ CIM providers with the VMware Update Manager.

After some investigation it seemed that the ESXi could not communicate with the CIM-Server. A restart of the CIM-Provider and clearing of the sensor-data and event-log seemed to fix the problem and the server was finaly able to gather data.

Install Zabbix on Raspberry PI 2

Wouldn’t it be cool to monitor your home? For example all your devices, but also temperature and other sensors an have all that data accessible via a web interfaces?

I think it would so, i thought about setting up Zabbix for home monitoring, but on the RaPi B and B+ it’s not the most performant setup, So i decided to try it again with the PI2.

This post provides a short log on how I set it up.

At first we have to download the source from Zabbix’ SF-page because there is no official package for the ARM-architecture available.

[pastacode lang=”bash” message=”zabbix installation” highlight=”” provider=”manual”]

cd /opt
wget http://downloads.sourceforge.net/project/zabbix/ZABBIX%20Latest%20Stable/2.4.6/zabbix-2.4.6.tar.gz?r=http%3A%2F%2Fwww.zabbix.com%2Fdownload.php&ts=1441447329&use_mirror=skylink^C
mv zabbix-2.4.6.tar.gz\?r\=http\:%2F%2Fwww.zabbix.com%2Fdownload.php zabbix-2.4.6.tar.gz
tar xfvz zabbix-2.4.6.tar.gz
cd zabbix-2.4.6/


#With ./configure --help we can see all the availalbe switches which can be used to compile zabbix.
root@raspberrypi /opt/zabbix-2.4.6 # groupadd zabbix
root@raspberrypi /opt/zabbix-2.4.6 # useradd -g zabbix zabbix
root@raspberrypi /opt/zabbix-2.4.6 # ./configure --help


#I used the follwoing switches to compile the zabbix server and agent, use a MySQL-DB, enable jabber-support, lib-xml2 - which is needed for webmonitoring, net-snmp, ssh and curl which is alos needed for webmonitoring. IPMI can be useful if you also hav a realy server with a BMC to monitor. But for most homeusers the IPMI-option is not neede if you only want to monitor your home and thats it. If you have a LDAP/AD-environment where you want to integrate zabbix you also should use the ldap-switch, but I think most home users also do not have a directory service running at home. ;)

#If this command is run there will ocure some erroes in most cases because there are missing dependencies

./configure --enable-server --enable-agent --with-mysql --with-jabber --with-libxml2 --with-net-snmp --with-ssh2 --with-libcurl


apt-get install apache2 php5-mysql mysql-server mysql-common mysql-utilities libiksemel-dev libiksemel-utils libxml2-dev libxml2-utils libxml2 snmp libsnmp-dev libsnmp-perl libssh2-1-dev libssh2-1 libcurl3 libghc-curl-dev libmysql++-dev php5-gd

#now all dependencies should be resolved
./configure --enable-server --enable-agent --with-mysql --with-jabber --with-libxml2 --with-net-snmp --with-ssh2 --with-libcurl

#copy init scripts
cp /opt/zabbix-2.4.6/misc/init.d/debian/* /etc/init.d/
#copy webfrontend
cp -r /opt/zabbix-2.4.6/frontends/php/* /var/www/zabbix/
chown -R www-data:www-data /var/www/zabbix/


#create the database
#at first log in to your mysql-server as a root useradd and runn the following commands
mysql -uroot -p
create database zabbix character set utf8 collate utf8_bin;
CREATE USER 'zabbix'@'localhost' IDENTIFIED BY 'zabbix';
GRANT ALL PRIVILEGES ON zabbix.* TO 'zabbix'@'%' WITH GRANT OPTION;
mysql -uzabbix -pzabbix zabbix < /opt/zabbix-2.4.6/database/mysql/schema.sql
mysql -uzabbix -pzabbix zabbix < /opt/zabbix-2.4.6/database/mysql/images.sql
mysql -uzabbix -pzabbix zabbix < /opt/zabbix-2.4.6/database/mysql/data.sql

#adapt configuration files at /usr/local/etc/ like in the attached examples
#create dircetories for logfiles:
mkdir -p /var/log/zabbix
chown -R zabbix:zabbix /var/log/zabbix/

#create dirs for alert & external scripts 
mkdir -p /var/zabbix/alertscripts
mkdir -p /var/zabbix/externalscripts
chown -R zabbix:zabbix /var/zabbix/


#configure php-settings
vim /etc/php5/apache2filter/php.init
post_max_size = 16M
max_execution_time = 300
max_input_time = 300
#select timezone from http://php.net/manual/en/timezones.php and set:
date.timezone = 

#restart/reload webserver to accept changes
service apache2 restart
service zabbix-server restart
service zabbix-agent restart

#open http:///zabbix in browser and finish installation


[/pastacode]


zabbix-conf